

Customizing AI Auto-Reply Flows
The AI auto-reply flow template works out of the box, but you can customize how the AI decides to respond, escalate, or skip. The main thing you'll want to change is the instructions — a single text field that controls the AI's behavior.
How escalation works
When the AI agent decides a ticket needs human attention, it escalates — meaning the flow automatically takes action to get the right person involved. By default, an escalation:
- Replies to the customer with a message acknowledging their issue and letting them know a team member will follow up
- Adds an internal note explaining why the AI escalated and what it found during research, so your team has context before they even open the ticket
- Tags the ticket (e.g., "escalated") for easy filtering
- Unassigns the ticket from the AI agent so it appears in your team's queue
The power is in the AI's judgment — it reads the customer's message, researches their account, checks your documentation, and decides whether it can help or whether a human would do better. You control that judgment by editing the instructions.
To manage escalated tickets, create a saved view filtered to the "escalated" tag. That becomes your team's escalation inbox. If you set up tiered escalation (see the advanced section), you can create separate saved views for each tier to give different teams their own queues.
Editing the instructions
The instructions tell the AI agent when to reply, escalate, or skip. To edit them:
- Go to Flows and select your auto-reply flow
- Click the first step (the Run AI Agent action)
- Edit the Instructions field
Write in plain language. Describe what the AI should reply to, what it should escalate, and what it should skip. You can also click the Generate button to describe what you want and have the AI rewrite the instructions for you.
Controlling escalation aggressiveness
The most common change is adjusting how quickly the AI escalates to a human. Here are three approaches you can copy and adapt:
Conservative (escalate quickly)
Use this if you'd rather have humans handle anything nuanced — for example, during onboarding or for a product with complex edge cases.
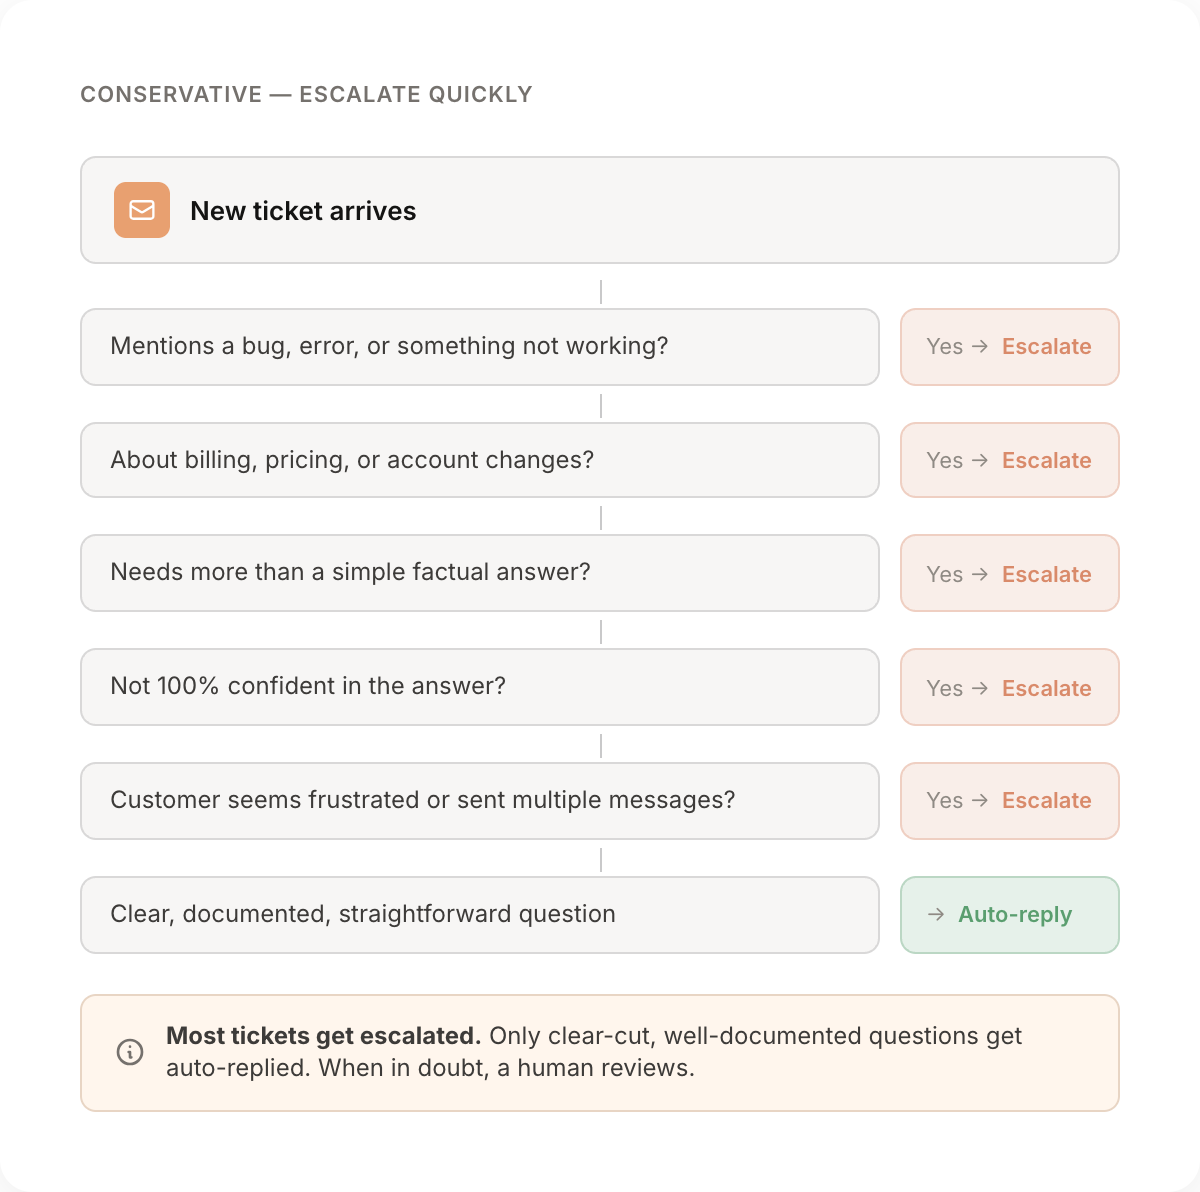
Be conservative with auto-replies. Only respond directly if the answer
is clearly documented and straightforward.

Escalate in any of these situations:
- The customer mentions a bug, error, or something not working
- The question involves billing, pricing, or account changes
- The question requires more than a simple factual answer
- You are not 100% confident in your response
- The customer seems frustrated or has sent multiple messages

When in doubt, escalate. It is always better to have a human review
than to send an incorrect or unhelpful response.
Aggressive (try harder before escalating)
Use this if you have comprehensive documentation and want the AI to resolve more tickets on its own.
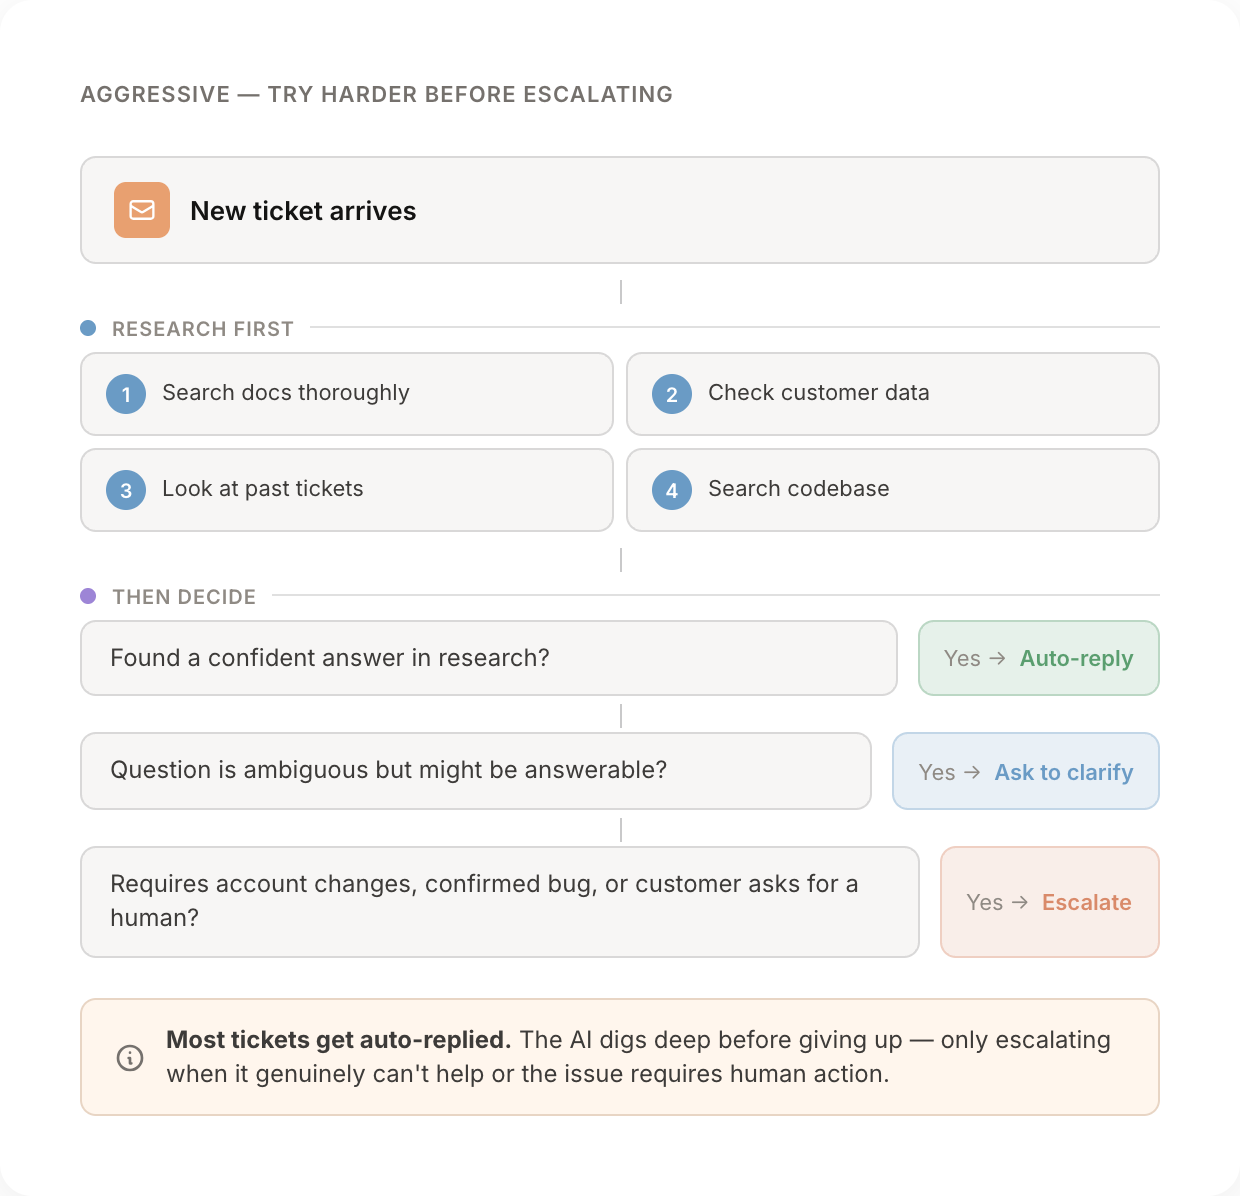
Be thorough in your research before escalating. Your goal is to resolve
as many tickets as possible without human intervention.

Before choosing to escalate:
1. Search the documentation thoroughly — try multiple search queries
2. Check the customer's account data for relevant context
3. Look for similar resolved tickets that might have solutions
4. If the codebase is connected, search for relevant implementation details

Only escalate if:
- The issue requires making changes to the customer's account
- You've exhausted your research and genuinely cannot find an answer
- The customer explicitly asks to speak with a human
- The issue is a confirmed bug that needs engineering attention

For ambiguous questions, ask one round of clarifying questions before
escalating.
Balanced (default)
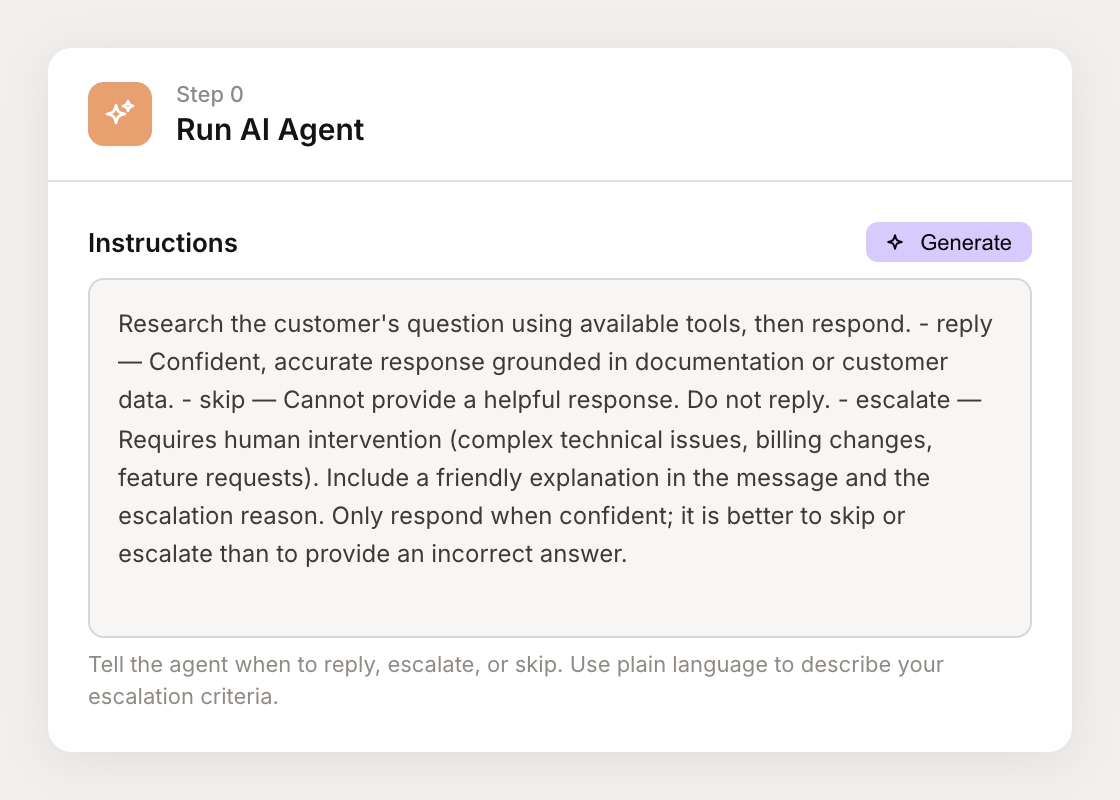
The default template sits between the two extremes:
Research the customer's question using available tools, then respond.

- reply — Confident, accurate response grounded in documentation
  or customer data.
- skip — Cannot provide a helpful response. Do not reply.
- escalate — Requires human intervention (complex technical issues,
  billing changes, feature requests).

Only respond when confident; it is better to skip or escalate than
to provide an incorrect answer.
Start here and adjust over time. If too many tickets are being escalated, make the instructions more thorough. If customers are getting unhelpful auto-replies, make them more conservative.
How the flow works
The auto-reply template is a multi-step flow with branching logic. The AI agent runs first, then the flow takes a different path depending on the agent's decision:
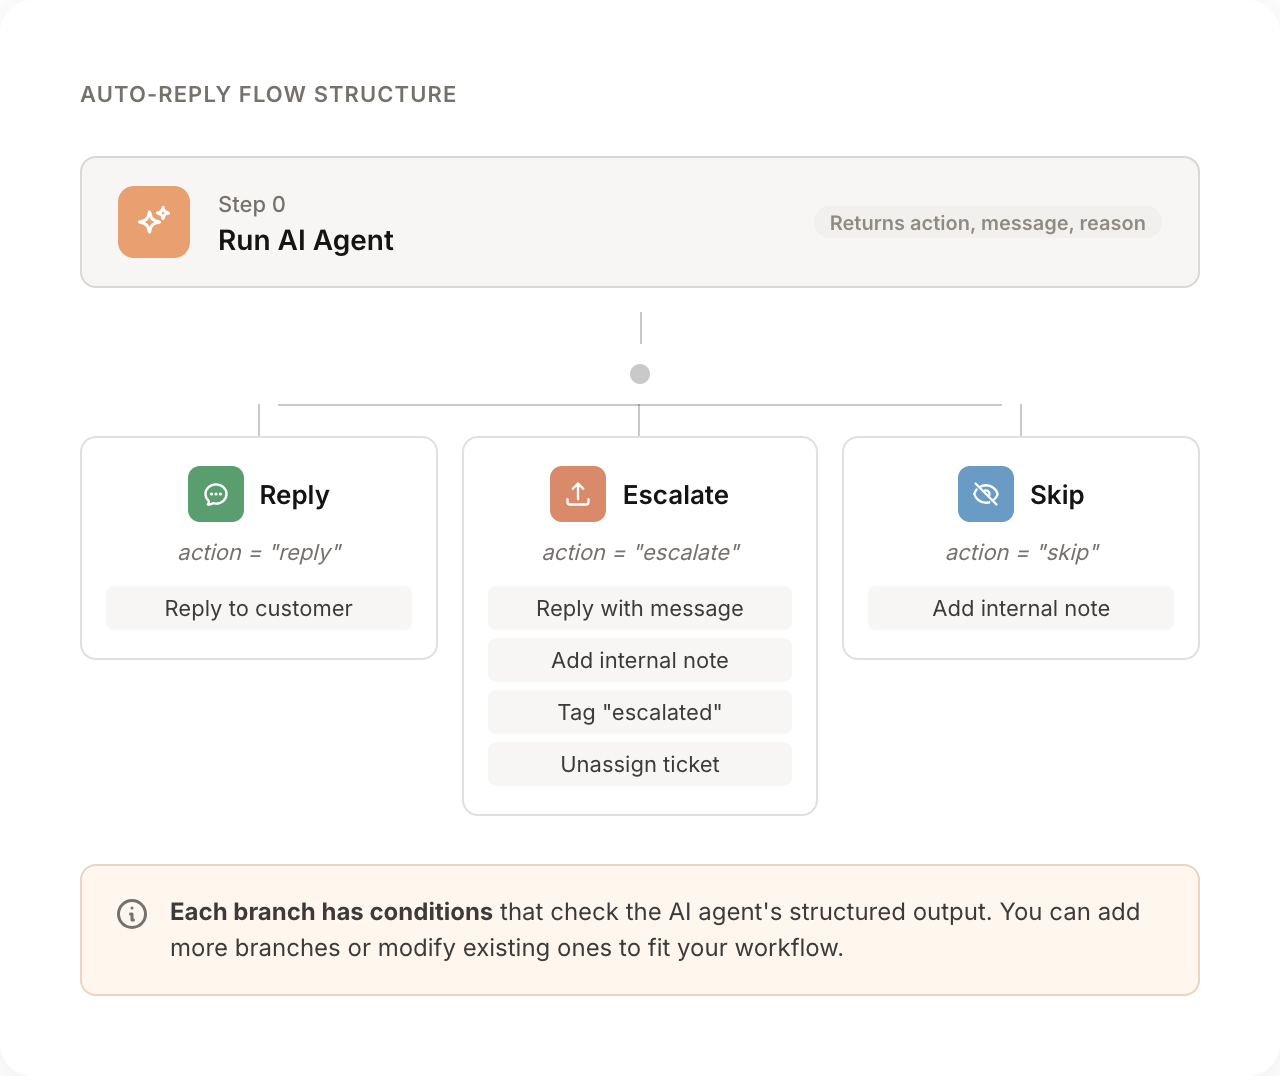
The AI agent returns structured output with three fields: action (reply, escalate, or skip), message (the response text), and reason (why it chose that action). The flow steps after the agent check these fields to decide which path to run.
Tips
Start with the default, then adjust. Run the template as-is for a week. Review which tickets were escalated vs. auto-replied, then tune the instructions.
Review escalation reasons. The AI includes a reason field explaining why it escalated. If it's escalating tickets it could have handled, update the instructions to cover those cases.
Set up saved views. Create a saved view filtered to the "escalated" tag so your team has a dedicated inbox for tickets the AI couldn't handle.
Test before going live. Use the agent debugger to run sample tickets through your flow and check the AI is making the right decisions.
Advanced: Escalation tiers and custom routing
The default template treats all escalations the same. If you need different escalation paths — routing billing issues to one team and technical issues to another, for example — you can extend the flow by modifying the output schema and adding flow steps.
This involves three changes:
1. Extend the output schema
Add an escalation_tier field to the output schema on the Run AI Agent action:
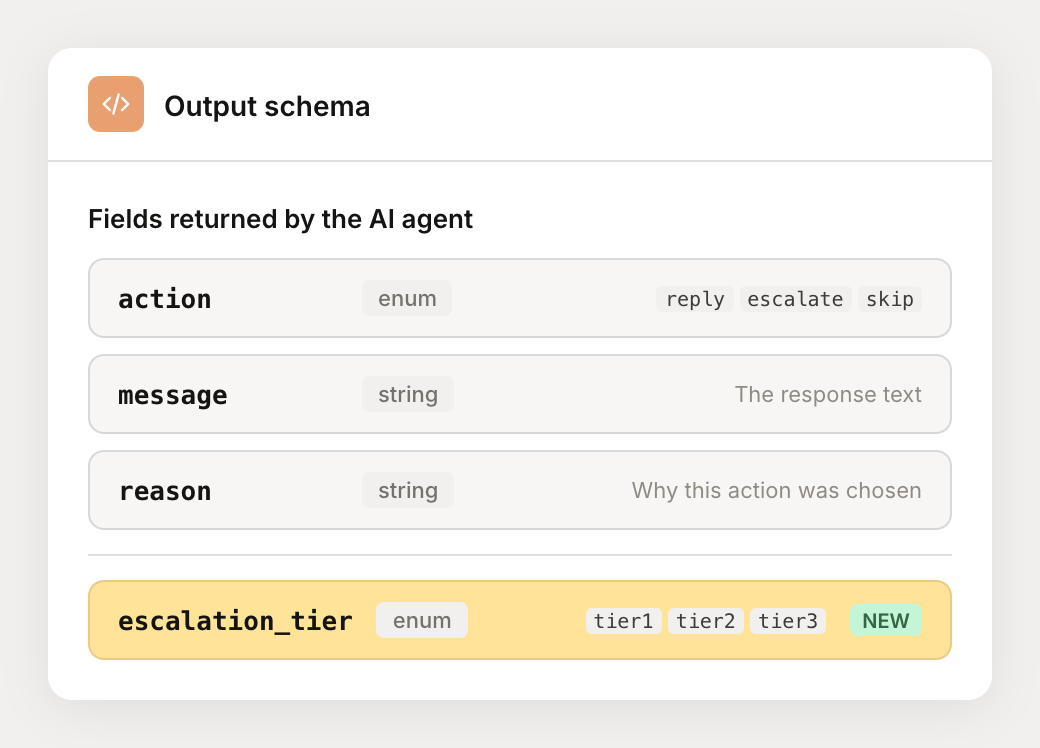
Name the enum values to match your team structure. Common patterns:
- By complexity:
"tier1" | "tier2" | "tier3" - By department:
"support" | "billing" | "engineering"
2. Update the instructions
Tell the agent how to choose the right tier:
When escalating, choose the appropriate tier:
- tier1: General questions that need a human touch
- tier2: Technical issues, bugs, integration problems
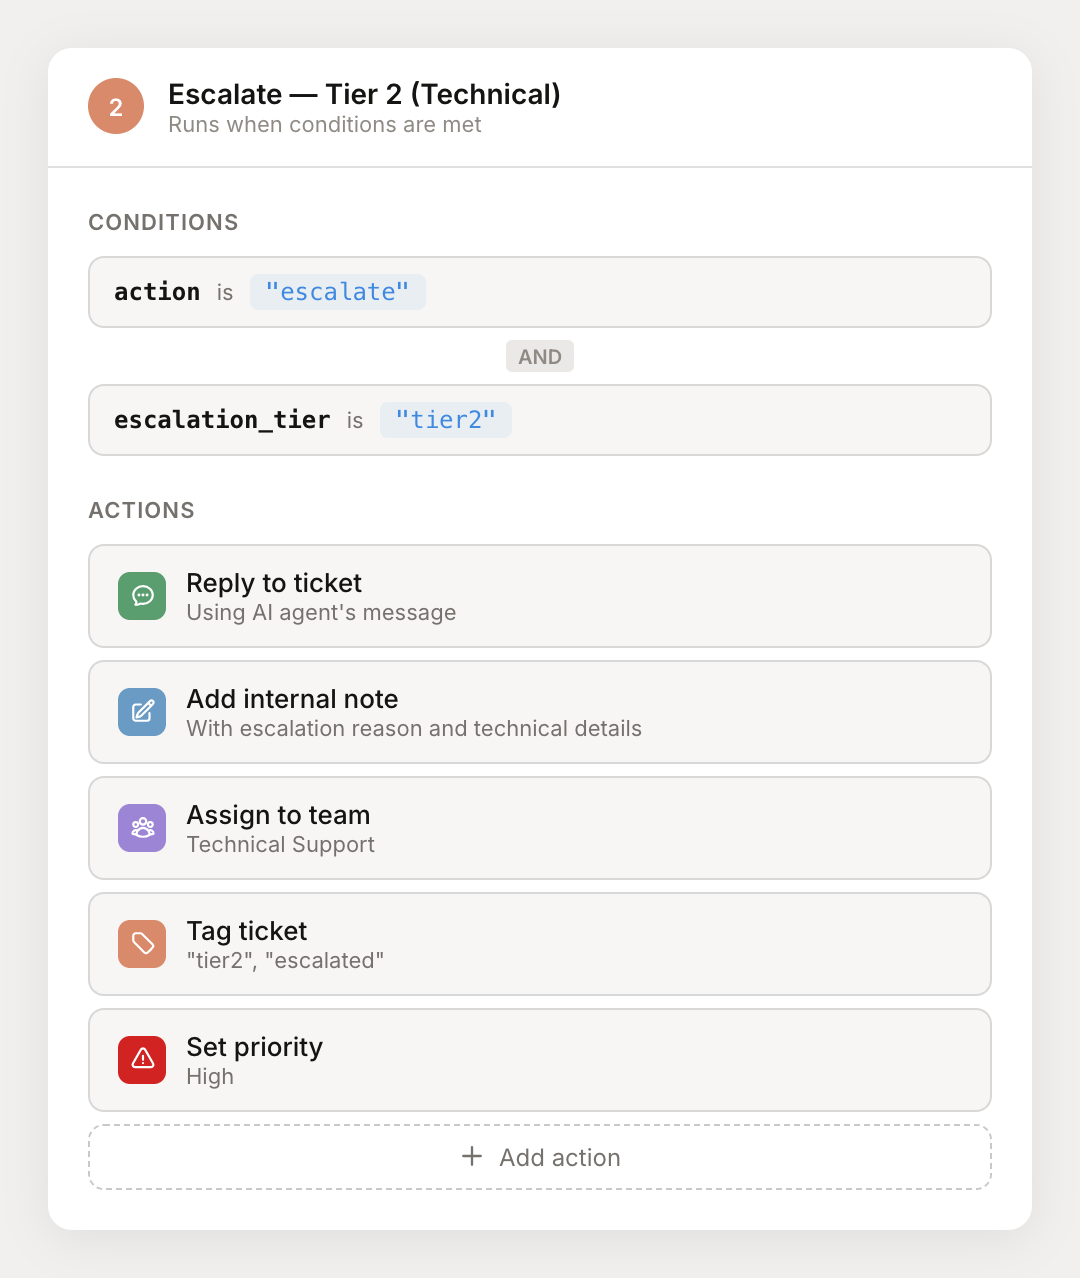
- tier3: Billing disputes, refund requests, or sensitive issues3. Create flow steps for each tier
Replace the single escalation step with separate steps for each tier. Each step has a condition checking both action is "escalate" AND escalation_tier matches, with actions appropriate for that tier (assign to team, set priority, tag, etc.).
The result is a flow where the AI triages and routes escalations to the right team automatically:
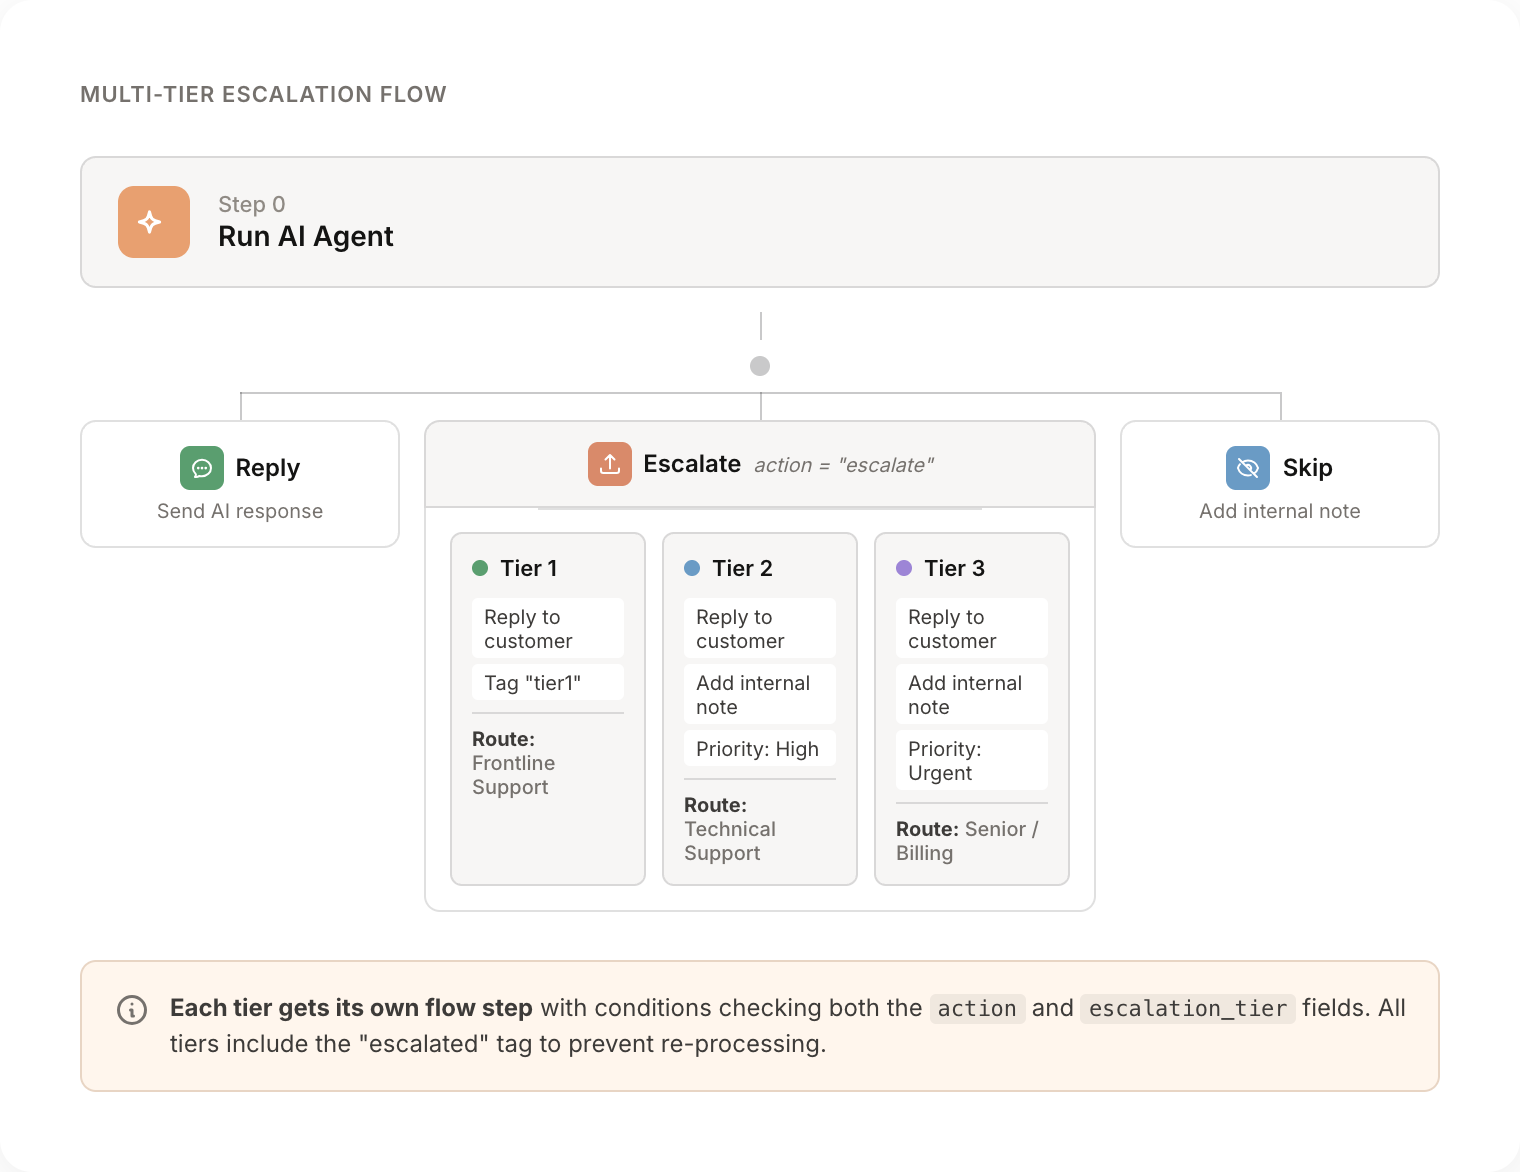
Each tier can tag differently (e.g., "tier1", "tier2"), and you create a saved view for each tag to give your teams separate inboxes.
Always include the "escalated" tag in every escalation step. The template uses this tag to prevent the flow from running again on already-escalated tickets.
For more on building flows, see Flows and Using agents in Flows.