Build Custom Conversion Funnels with Usage Events
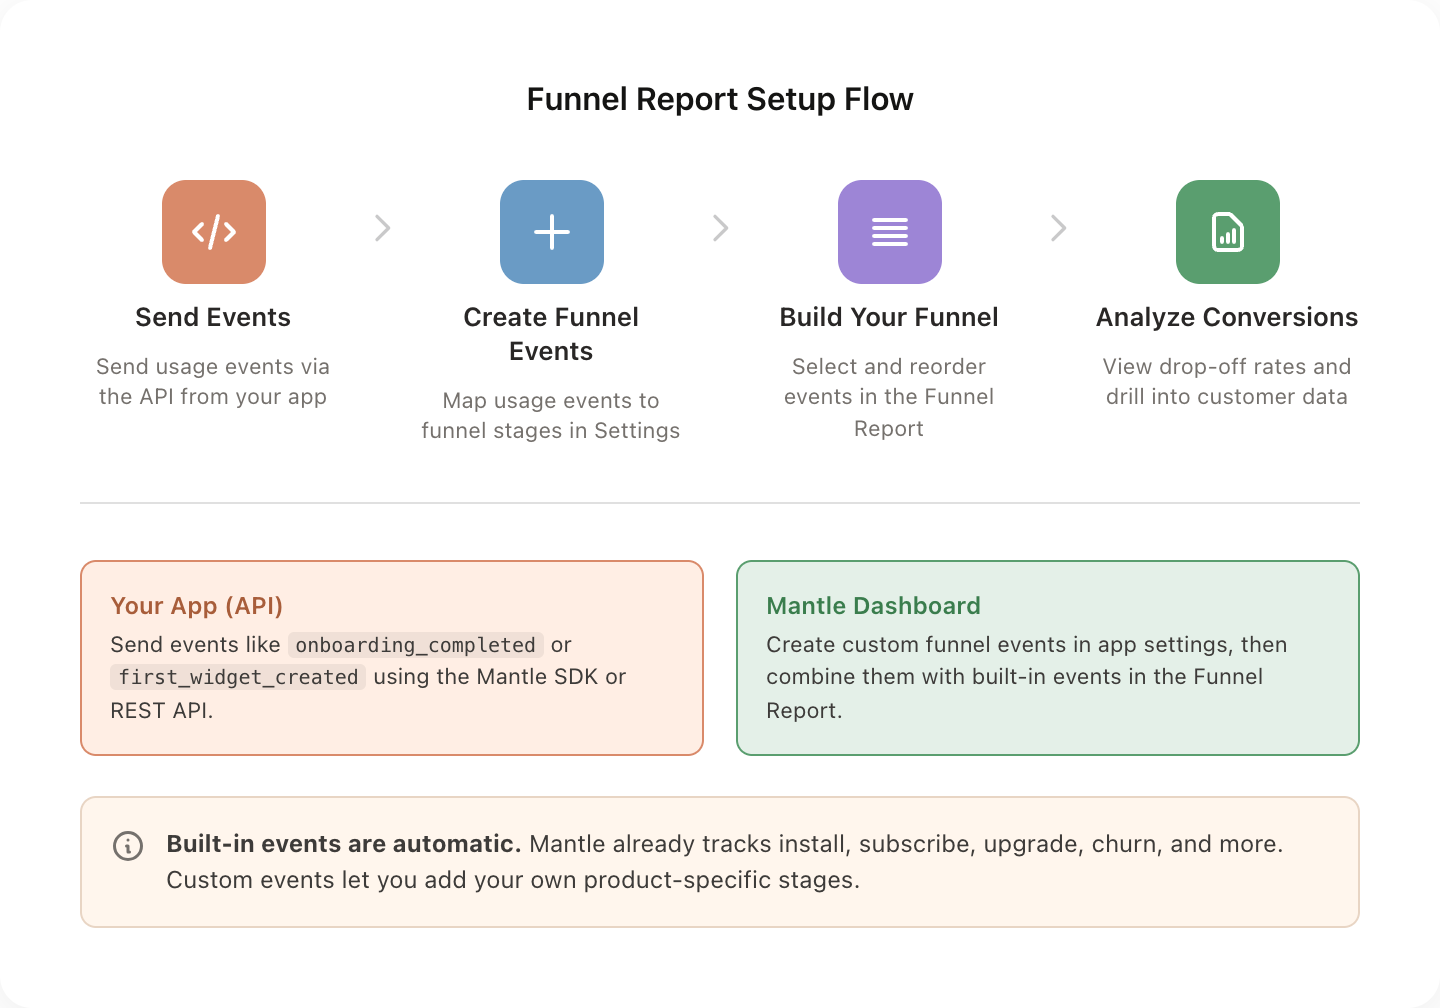
If you are running a product analytics tool like Mixpanel alongside Mantle just to track conversion funnels, you might not need to. Mantle's Funnel Report lets you build custom conversion funnels that combine built-in lifecycle events (install, subscribe, upgrade) with your own product-specific events -- all without leaving your billing and analytics dashboard.
This guide walks you through setting up custom funnel events and using the Funnel Report to understand how your customers convert from install to paid and beyond.
Built-in funnel events
Before you set up anything custom, Mantle already tracks a set of lifecycle events for every customer automatically. You can use any of these in your funnel:
| Event | What it tracks |
|---|---|
| Installed | Customer installs your app |
| Trial Started | Customer begins a free trial |
| Trial Converted | Customer converts from trial to paid |
| Subscribed | Customer subscribes to a plan |
| Upgraded | Customer upgrades to a higher plan |
| Downgraded | Customer switches to a lower plan |
| Unsubscribed | Customer cancels their subscription |
| Uninstalled | Customer removes your app |
| Reinstalled | Customer re-installs after uninstalling |
| Resubscribed | Customer re-subscribes after canceling |
| Charge abandoned | Customer abandons a pending charge |
| One-time charge | Customer completes a one-time purchase |
| First transaction | Customer's first ever transaction |
These built-in events cover the standard subscription lifecycle. But what about product-specific milestones like "completed onboarding" or "created their first widget"? That is where custom funnel events come in.
Step 1: Send usage events from your app
Custom funnel events are powered by usage events -- data you send to Mantle from your app. Before you can create a funnel event, you need to be sending the underlying usage events via the API.
Use the Mantle SDK or REST API to send events from your app:
// Using the Mantle JS SDK
await mantleClient.sendUsageEvent({
  eventName: "onboarding_completed",
  properties: {
    step: "complete",
  },
});

// Another example: tracking a key product action
await mantleClient.sendUsageEvent({
  eventName: "widget_created",
  properties: {
    widget_type: "banner",
    is_first: "true",
  },
});
Or use the REST API directly:
POST https://appapi.heymantle.com/v1/usage_events
Headers:
  X-Mantle-App-Id: your-app-id
  X-Mantle-Customer-Api-Token: customer-token

Body:
{
  "eventName": "onboarding_completed",
  "properties": {
    "step": "complete"
  }
}
Tip: Choose event names that clearly describe the action, like
onboarding_completed,first_product_created, orplans_page_viewed. You can also include properties to make events more specific -- for example, sending a genericpage_viewevent with apathproperty lets you create multiple funnel events from a single event type.
Step 2: Create custom funnel events
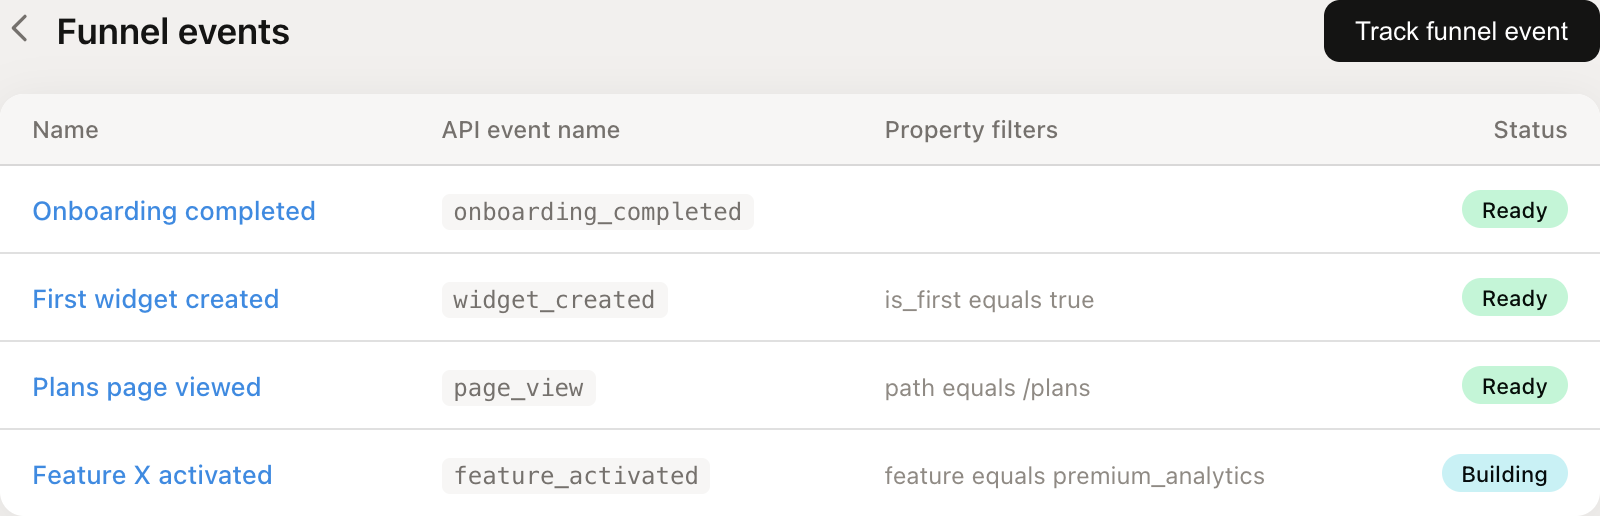
Once your app is sending usage events, go to Apps > [Your App] > Funnel Events and click Track funnel event.
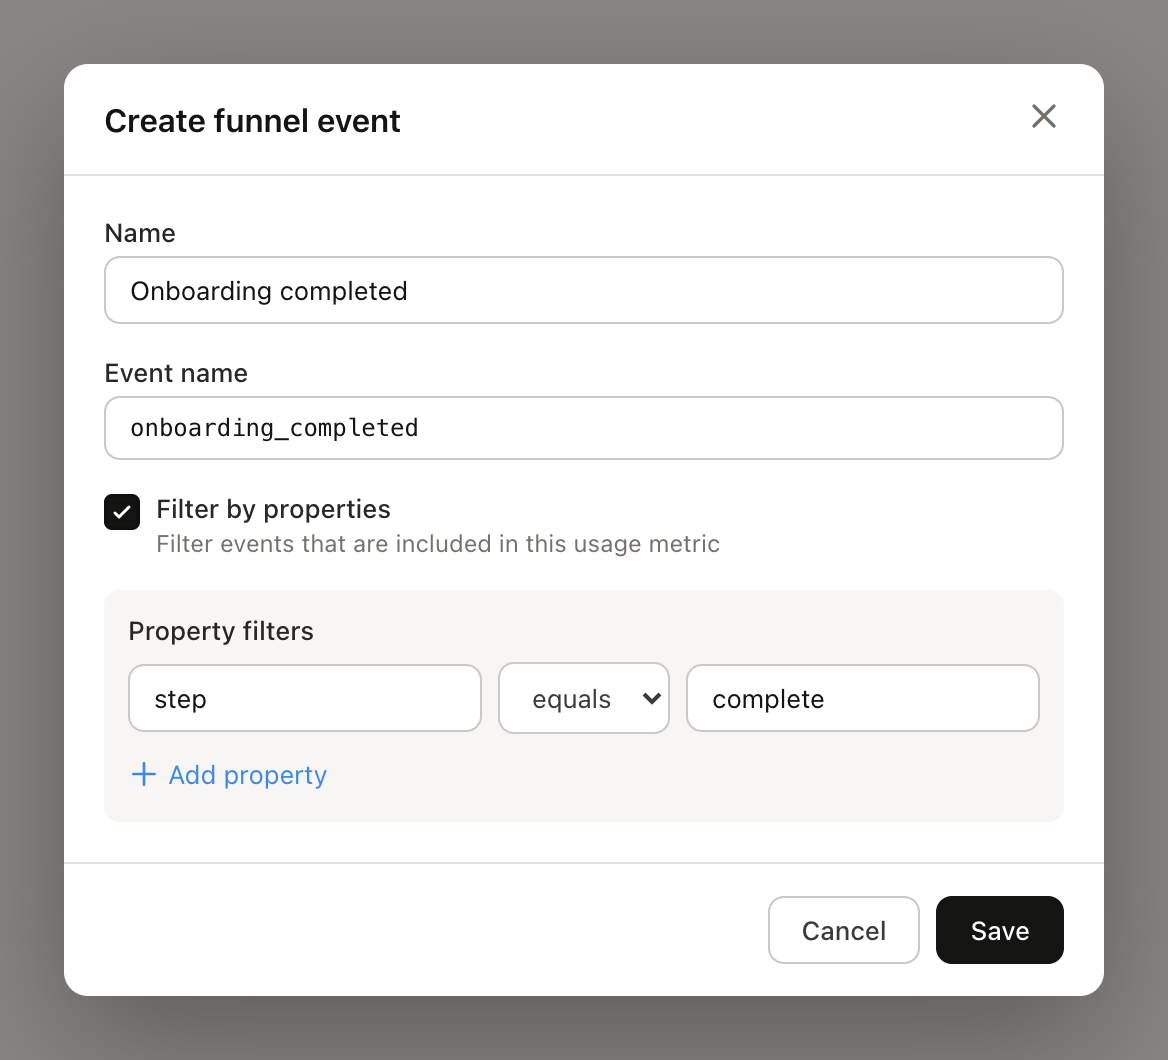
For each custom funnel event, you provide:
Name -- A human-readable label, like "Onboarding completed" or "First widget created"
Event name -- The exact
eventNamevalue you send via the API (e.g.,onboarding_completed)Property filters (optional) -- Narrow down which events count. For example, only count
page_viewevents wherepathequals/plans
After saving, the event will show a Building status while Mantle processes your historical data. Once it switches to Ready, it is available in the Funnel Report.
Step 3: Build and read your funnel
Go to Reports > Funnel to open the Funnel Report. Use the toolbar to configure your view:
Select events -- Click the events filter to choose which events appear in your funnel. Your custom funnel events show up alongside the built-in ones.
Reorder events -- Click "Change event order" to drag events into the sequence that matches your customer journey.
Set date range -- Filter to a specific time period.
Filter by app -- If you have multiple apps, select which one to analyze.
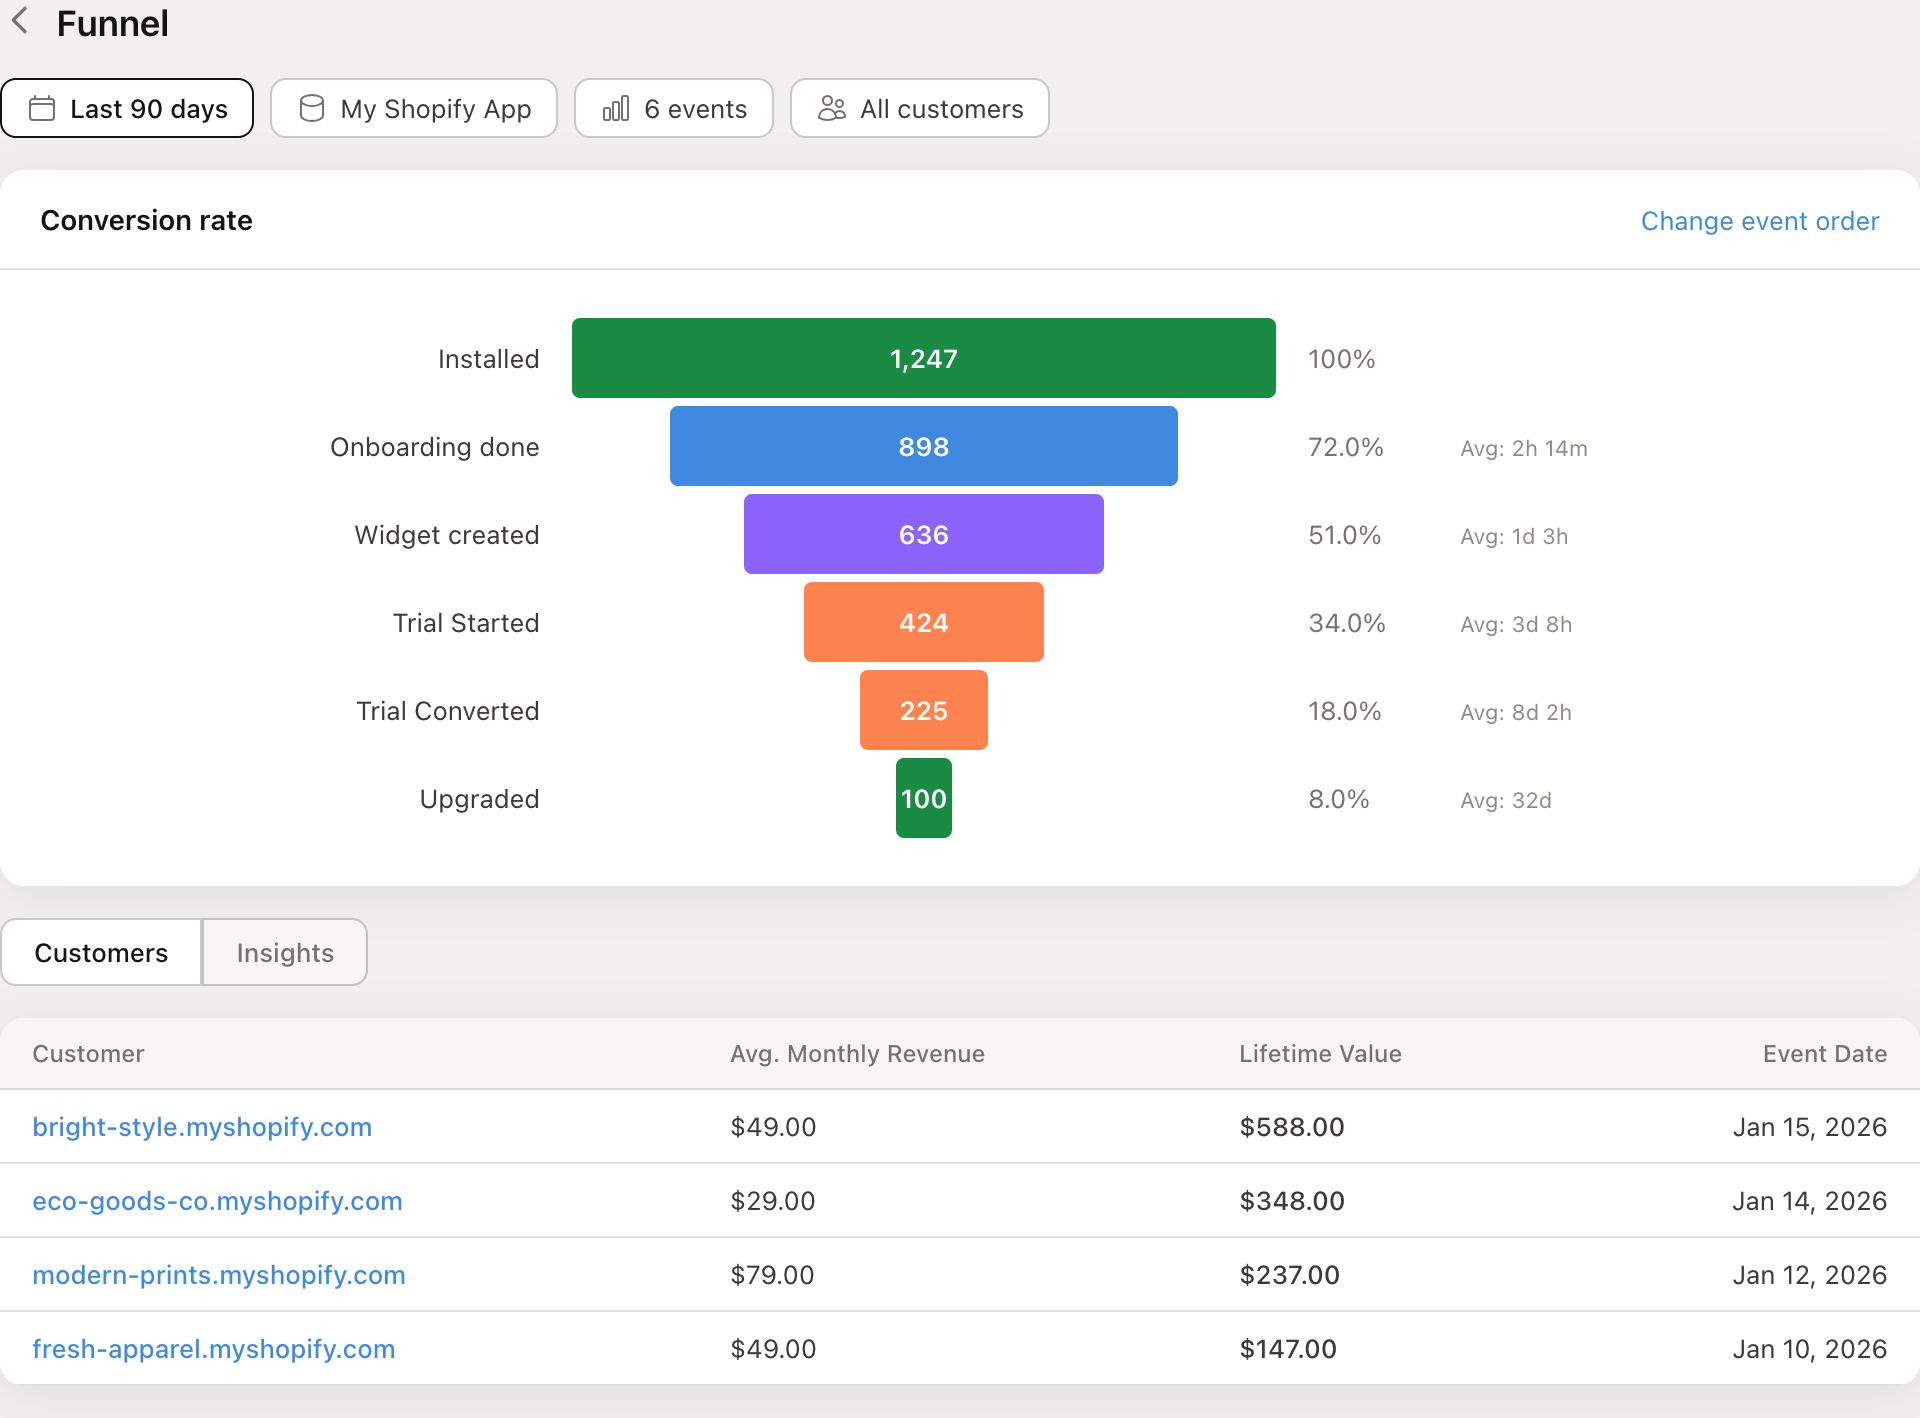
The funnel chart shows:
Customer count at each stage (the number inside each bar)
Conversion rate from the first step (the percentage on the right)
Average time between steps (how long customers typically take to move from one stage to the next)
Click on any funnel step to see the customer list below the chart. This shows exactly which customers are at that stage, along with their average monthly revenue and lifetime value.
Tips and advanced features
Customer segments
Use the customer segment filter to compare funnel performance across different groups -- for example, customers on your Pro plan vs. Free plan, or customers from a specific region.
Comparison periods
Turn on comparison mode to see how your funnel has changed over time. Compare the current period against the previous period to spot trends in conversion rates.
Insights view
Switch from the "Customers" tab to "Insights" below the funnel chart. The Insights view gives you a report builder where you can group customers by different properties and calculate metrics like average lifetime value for each funnel stage.
Example funnels
Here are some useful funnel configurations to try:
| Funnel type | Events to include |
|---|---|
| Full lifecycle | Installed > Trial Started > Trial Converted > Upgraded |
| Onboarding to paid | Installed > Onboarding completed > Subscribed |
| Product activation | Installed > First widget created > Plans page viewed > Subscribed |
| App Store to install | App Listing Page View > Add App Button Clicked > Installed (requires BigQuery) |
Go further
Funnel Report reference -- Full documentation on the Funnel Report
Integrating usage events -- Full API reference for sending usage events
Usage events and metrics -- Overview of usage tracking in Mantle
Google Analytics / BigQuery integration -- Add App Store page views to your funnel