

Documentation & knowledge base
Stop telling customers to check the docs when you don't have any. Mantle's documentation platform lets you create a professional knowledge base that your customers can browse—and that powers AI responses across your help desk.
Every article you write does double duty: customers find answers on their own, and your AI agents use the same content to suggest accurate responses.
Docs repositories
A repository is a collection of documentation for one of your apps. Each repository gets its own hosted website, so you can have separate docs for different apps or different audiences (user docs, developer docs, etc.).
Creating a repository
Go to Helpdesk > Docs
Click Add repository
Enter a name and URL handle—your docs will be at
handle.mantledocs.comSelect which app this documentation is for
Internal documentation
Not all documentation is meant for customers. Mantle supports internal documentation — repositories that are only accessible to your team members after they log in.
Internal docs are useful for:
Team knowledge bases — SOPs, onboarding guides, and internal processes
Support playbooks — Troubleshooting steps and escalation procedures that agents reference but customers shouldn't see
Product documentation for your team — Technical specs, architecture notes, or internal feature guides
Setting up internal docs
Create a new repository (or open an existing one's settings)
In repository settings, find the Visibility setting
Change it from Public to Internal - Team members only
When a repository is set to internal, anyone who visits the docs URL is redirected to log in first. Only team members in your organization with the right permissions can view the content.
Managing access
By default, all team members have access to all internal docs. If you need more granular control:
Go to Settings > Team and open a team member's profile
Uncheck Has access to all internal documentation sites
Select the specific internal repositories they should be able to access
This lets you restrict sensitive documentation to specific teams — for example, limiting engineering docs to your development team while keeping support playbooks available to everyone.
Importing existing docs
Already have documentation hosted elsewhere? Import it instead of starting from scratch. This is the fastest way to get up and running.
Click the dropdown next to Add page and select Import pages
Enter the URL of your existing documentation
Choose which collection to import into (or create a new one)
Click Import to start
Mantle scrapes the site and creates pages in your repository. The import runs in the background—you'll see a progress indicator while it works.
Start with a single section or page to test the import, then import more once you're satisfied with the results. Imported pages come in as drafts, so you can edit them before making them public.
Organizing content
A clear structure makes the difference between documentation that helps and documentation that frustrates. Mantle organizes your content in a hierarchy that maps directly to what your customers see when they browse your docs site.

Collections
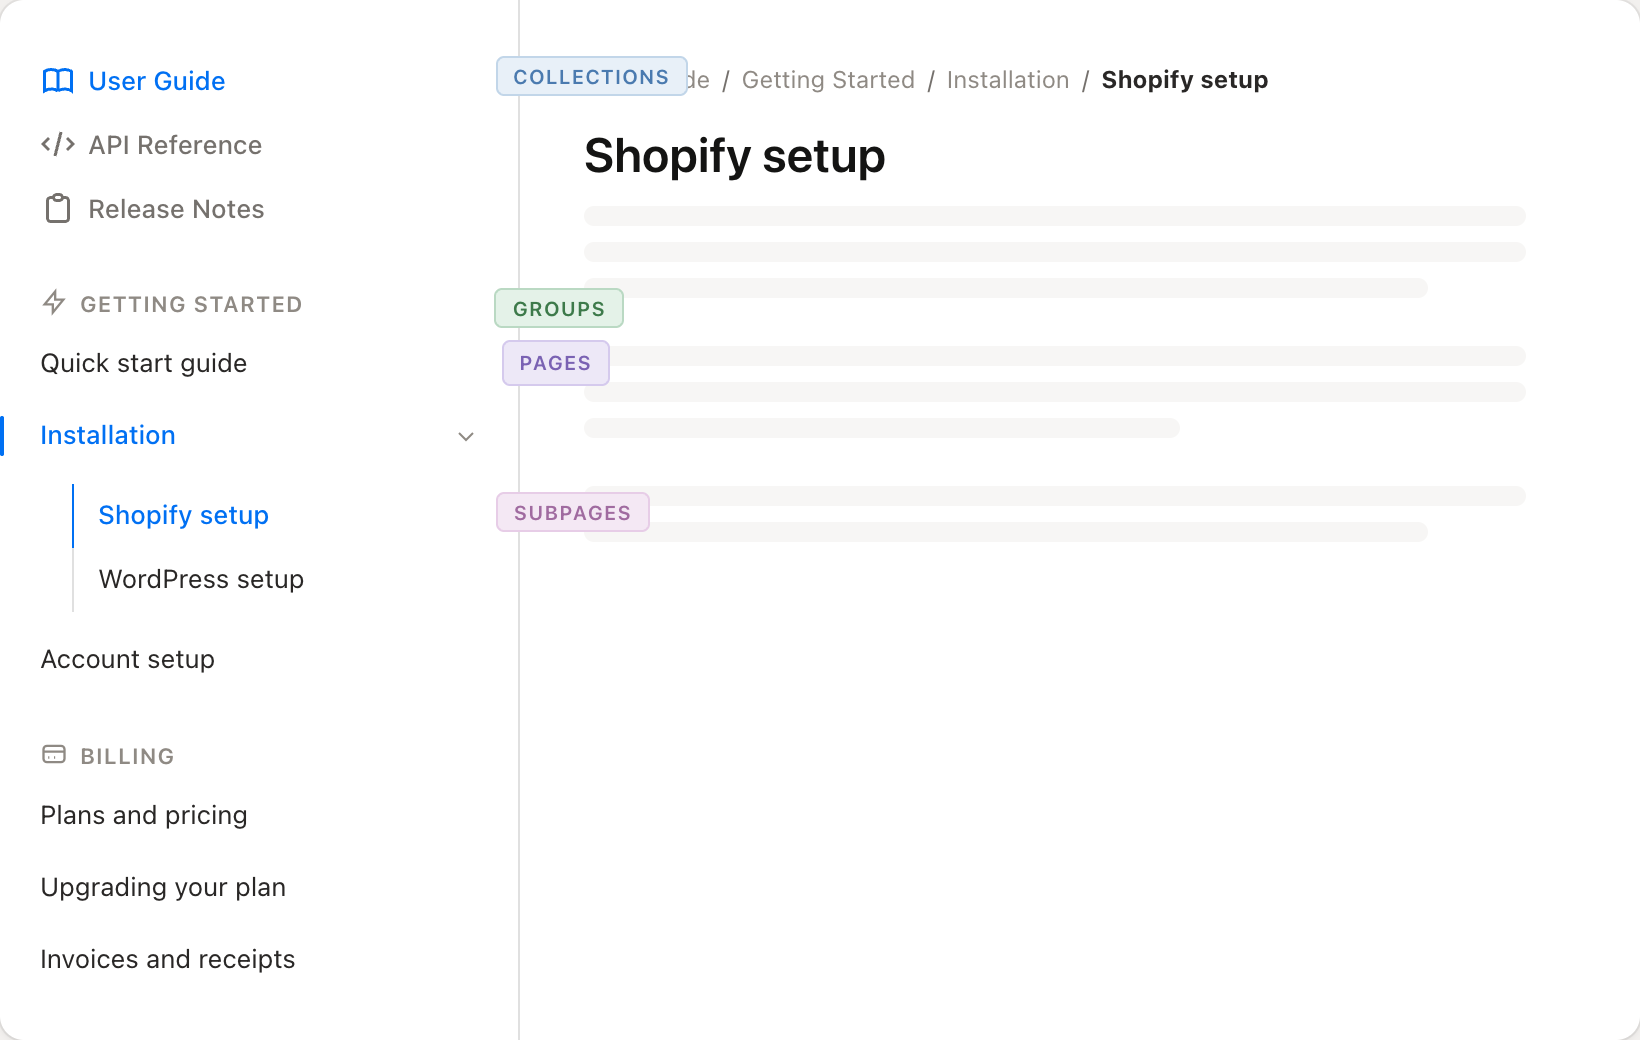
A collection is the top level of your content hierarchy. It represents a major section of your documentation, like "User Guide", "API Reference", or "Release Notes".
On your customer-facing docs site, collections appear as top-level links in the sidebar navigation. If your repository only has one collection, the collection name is hidden and visitors go straight to the content. When you have multiple collections, each one appears as a separate navigation tab with its own icon.
Every repository starts with a single default collection. You only need additional collections when you have distinctly separate content areas that deserve their own navigation space. Common examples:
User docs + API docs — separate audiences with different content
Product guides + Release notes — different types of content that change at different paces
Admin docs + End-user docs — different permission levels or user roles
Groups
A group is a category within a collection. Groups organize related pages together and appear as labeled sections in the sidebar navigation. Each group can have a title, description, and optional icon.
Think of groups as chapters in a book. In the customer-facing sidebar, each group shows as a small uppercase heading with its pages listed underneath. For example, a "User Guide" collection might have groups like "Getting Started", "Billing", and "Integrations".
Good group design makes your docs scannable at a glance. Aim for:
One group per feature area or topic cluster — each group should cover a coherent set of related pages
3 to 8 pages per group — too few and the group adds unnecessary structure; too many and it becomes hard to scan
Clear, concise names — "Billing" is better than "Billing and Payments Management"
Pages and subpages
A page is an individual article containing your actual documentation content. Pages live inside groups and appear as clickable links in the sidebar.
Any page can have subpages nested underneath it. When a page has children, it shows a chevron in the navigation. Clicking the chevron expands the page to reveal its subpages, indented and connected by a vertical line. Subpages can have their own children too, up to 3 levels of nesting.
| Level | What it is | Navigation appearance |
|---|---|---|
| Top-level page | A page directly inside a group | Listed under the group heading |
| Subpage (depth 1) | A page nested under another page | Indented with a left border, shown when parent is expanded |
| Subpage (depth 2) | A page nested under a subpage | Further indented, shown when grandparent and parent are expanded |
| Subpage (depth 3) | Maximum depth | Deepest level of indentation |
When to use subpages vs. separate top-level pages:
Use subpages when a topic has clearly subsidiary content that only makes sense in context of the parent. Example: an "Installation" page with "Shopify setup" and "WordPress setup" as subpages.
Use separate pages when topics are equally important and can stand on their own. Example: "Plans and pricing" and "Invoices and receipts" should be separate pages in a "Billing" group, not nested under each other.
Keep nesting shallow. If you find yourself going 3 levels deep, consider whether those pages should be promoted to top-level pages in their own group instead.
How the hierarchy maps to navigation
Everything you set up in the tree view translates directly to what customers see on your docs site:
Collections appear as top-level links at the top of the sidebar (with optional icons)
Groups appear as small uppercase section headings within the selected collection
Pages are listed under their group as clickable links
Subpages are hidden by default and revealed when a parent page is expanded with the chevron toggle
The order of collections, groups, and pages in the navigation matches the order you set in the admin tree view. Reorder items there, and the customer-facing navigation updates to match.
Managing the tree
Your repository detail page shows a tree view of all your content. The left sidebar lists your collections, and the main area shows the groups and pages for the selected collection.
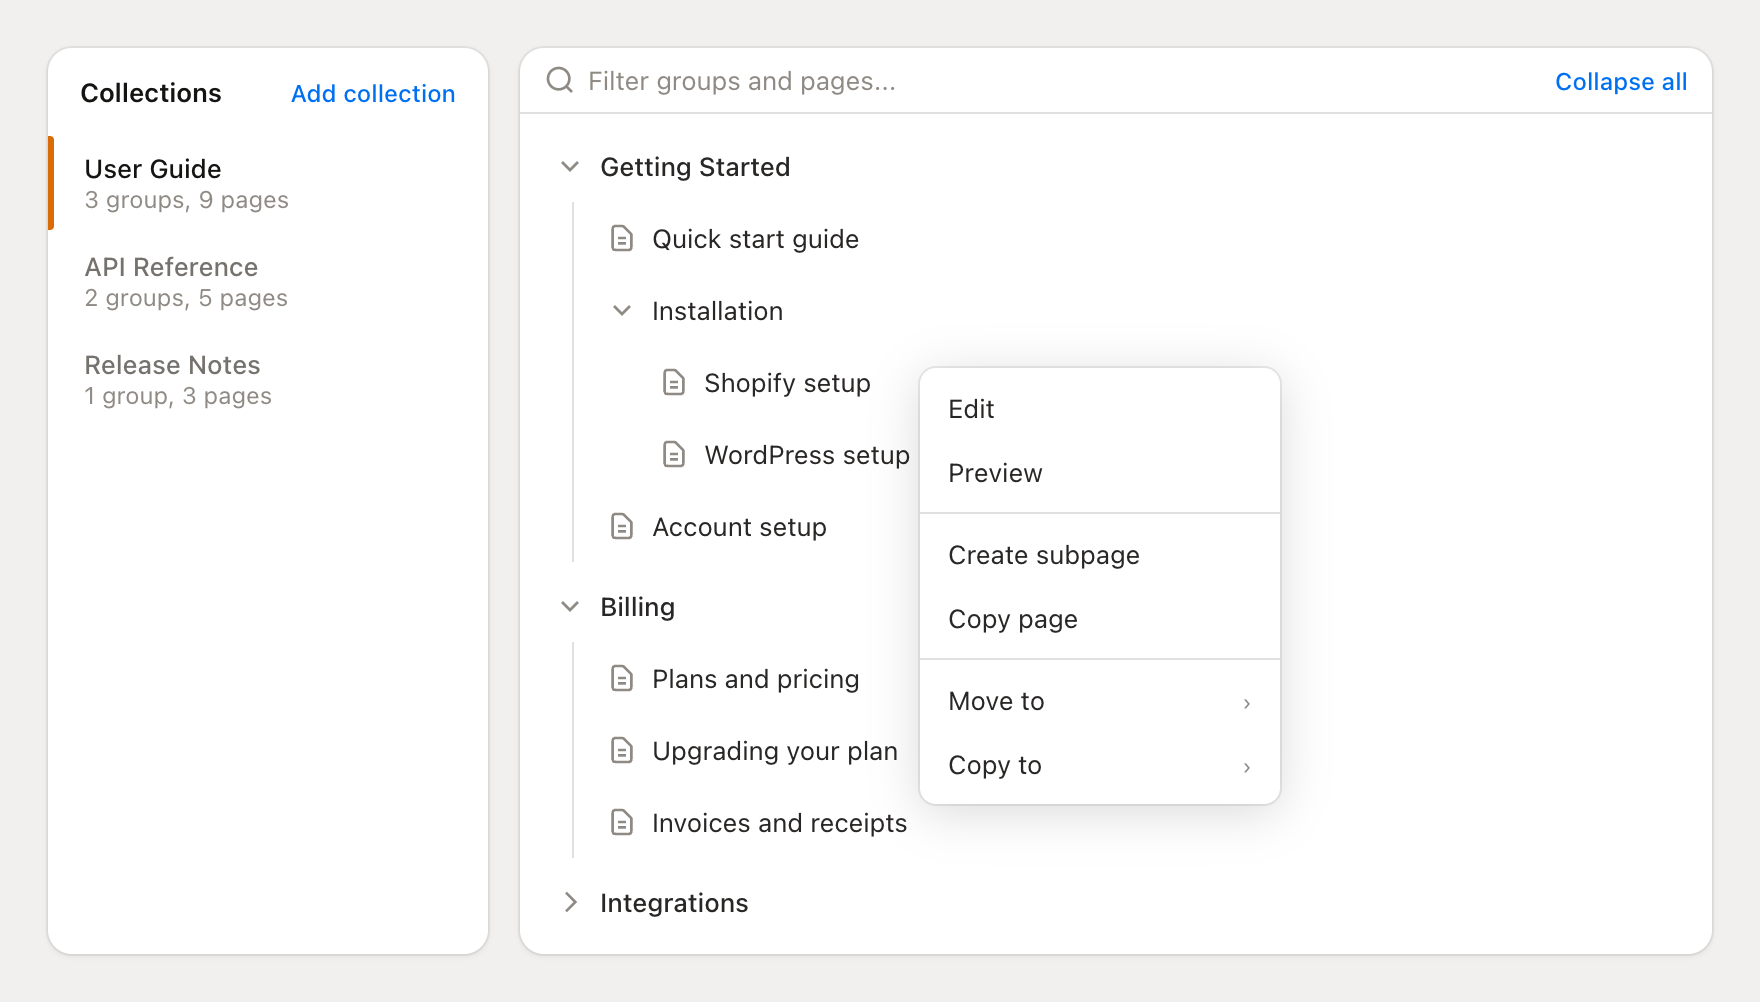
Creating items:
Click Add page at the top of the page to create a new page (you can choose a group or create a new one during the flow)
Click Add group to create a new group within the current collection
Click Add collection in the Collections sidebar to create a new collection
To create a subpage, hover over a page and click the + icon, or right-click a page and choose Create subpage
Reordering:
Drag and drop pages to reorder them within a group, or move them between groups
Drag a page onto another page to make it a subpage
Groups can also be reordered by dragging within the tree
Collections can be reordered by dragging in the Collections sidebar
Right-click context menu:
Right-click any page in the tree to access quick actions:
Edit — open the page for editing
View / Preview — see the published page or preview a draft
Create subpage — add a child page underneath this page
Copy page — duplicate the page as a sibling
Move to — move the page to a different group or collection
Copy to — copy the page to a different group or collection
Filtering and navigation:
Use the filter field at the top of the tree to search for pages by name. The tree filters in real time, showing only matching pages and their parent groups.
Click Expand all / Collapse all to control the tree's visibility
Click a group name to edit its title, description, handle, and icon
Creating content
Click any page in the tree to open it for editing. The editor supports rich text formatting without needing to write HTML.
Editor features
Text formatting — Headings, bold, italic, strikethrough, links
Lists — Bulleted and numbered lists, nested items
Code — Inline code and syntax-highlighted code blocks
Media — Images, videos, and embeds
Callouts — Tip, warning, and info boxes
Tables — Simple data tables
Need to edit raw HTML? Click the HTML button in the toolbar to switch to code view.
Page settings
Each page has settings for SEO and discoverability:
Handle — The URL slug for this page
SEO title — Custom title for search engines (defaults to page title)
SEO description — Meta description for search results
Open Graph image — Preview image for social sharing
Publishing
Pages start as drafts, visible only to your team. When ready:
Click Publish to make the page live on your docs site
After publishing, any edits create a new draft version
Publish again to push draft changes live
You can also unpublish a page to hide it from customers while keeping the content, or archive it to remove it from navigation entirely.
AI-powered content creation
Mantle's AI tools help you create documentation faster. Generate entire pages, write specific sections, or create custom images—all without leaving the editor.
Generating content with AI
Instead of writing from scratch, describe what you want and let AI create the first draft.
Click the Generate button in the editor toolbar
Describe what content you want—"a getting started guide" or "troubleshooting steps for billing issues"
Click Generate to create the content
The AI uses your page title and any existing content as context, so generated content stays relevant to your documentation structure. You can generate:
Full page content — Complete articles with headings and sections
Inline replacements — Select text and ask AI to rewrite or expand it
SEO fields — Titles and descriptions optimized for search
Be specific in your prompts. "A guide explaining how to set up webhooks with code examples" works better than "webhook documentation."
Generating images with AI
Create custom illustrations, diagrams, and screenshots directly in the editor. No design tools needed.
Click the image icon in the toolbar, then select Generate with AI
Describe the image you want—include style, colors, and content details
Optionally add reference images to guide the style
Click Generate and wait for the result
Click Use image to insert it into your page
You can also edit existing images—describe the changes you want and AI will modify the image while preserving its core content.
Auto-translation
When you edit content in your default language, Mantle can automatically translate it to your other languages. No manual translation work needed.
To enable auto-translation:
Go to your repository's Languages settings
For each language, toggle Auto-translate on
Edit your content in the default language as usual
When you save changes to your default language content, Mantle queues translations for all enabled languages. Changes are batched together—if you make multiple edits within 10 minutes, they're translated in a single batch to maintain consistency.
AI suggestions
Mantle continuously analyzes your documentation and suggests improvements. Look for the magic wand icon on pages and collections—it shows how many suggestions are available.
Suggestions include:
SEO improvements — Better titles and descriptions for search visibility
Content improvements — Clarifications, missing details, or confusing sections
Structure suggestions — Recommendations for organizing or splitting content
For each suggestion, you'll see the recommended change and why it matters. Click Apply to accept a suggestion, or Dismiss to hide it.
Customizing your docs site
Every repository gets a hosted website that you can customize to match your brand.
Click Customize website in repository settings to open the theme editor:
| Section | Options |
|---|---|
| Branding | Logo, accent colors (light and dark mode) |
| Header | Site title, search bar visibility |
| Footer | Copyright text, additional links |
The preview updates in real-time as you make changes. Click Save changes when you're happy with the design.
Repository settings
Each repository also has settings for hosting and localization:
| Setting | Description |
|---|---|
| Visibility | Public (anyone can view) or Internal (team members only, requires login) |
| Subdomain | Your docs URL on mantledocs.com |
| Custom domain | Connect your own domain (e.g., docs.yourapp.com) |
| Languages | Add translations and set a default language |
| Widget | Embed a support widget on your docs site (public repos only) |
| Redirects | Forward old URLs to new locations |
To access settings, click the gear icon on any repository.
Docs MCP server
Every docs repository automatically gets its own MCP (Model Context Protocol) endpoint. This means AI tools like Claude Desktop, Cursor IDE, or any MCP-compatible client can connect directly to your documentation and read it programmatically.
Your Docs MCP endpoint is available at:
https://your-handle.mantledocs.com/mcp
If you're using a custom domain, it's at:
https://docs.yourapp.com/mcp
What AI tools can do with it
The Docs MCP provides three read-only tools:
| Tool | What it does |
|---|---|
get_docs_tree |
Browse your full documentation structure—collections, groups, and pages |
get_docs_page |
Read the full content of any published page |
search_docs_pages |
Search across all published pages with full-text search |
No authentication is required for public repositories—any MCP client can connect and read your published docs.
Why this matters
Your customers and their AI tools can use your documentation as context. Instead of copy-pasting docs into a chat window, an AI tool can connect to your MCP endpoint and access your entire knowledge base directly. This is useful for:
AI-assisted development — Developers using Cursor or similar tools get your API docs and guides as context while coding
Customer support bots — Third-party AI assistants can reference your docs to answer questions accurately
Internal tools — Your team can build AI workflows that pull from your documentation automatically
Connecting an AI tool
Point any MCP client at your docs endpoint. For example, in a Claude Desktop or Cursor configuration:
{
  "mcpServers": {
    "my-app-docs": {
      "type": "http",
      "url": "https://your-handle.mantledocs.com/mcp"
    }
  }
}
Once connected, the AI tool can browse your documentation structure and read any published page.
For more about Mantle's MCP servers, see MCPs Overview.
How docs power AI
Your documentation directly improves AI-powered support:
Response suggestions — Agents cite your docs when drafting replies
Automated chat — The chat widget answers questions using your knowledge base
Ticket analysis — AI understands customer issues better with product context
The more complete your documentation, the better your AI performs. Focus on common questions, troubleshooting guides, and feature explanations.
Go further
Getting started with help desk — Overview of Mantle's help desk features
Docs landing page — Configure how visitors land on your docs site
MCPs Overview — Learn about all of Mantle's MCP servers, including Docs MCP
AI agents — Create agents that use your docs for intelligent responses
AI-powered support — How AI improves your customer service
Support channels — Set up email, chat, and other channels