

Using the docs editor
The docs editor is where you write and manage the content of your help articles. This guide covers everything you can do inside the editor — from basic formatting to AI-powered content generation.
Opening the editor
There are two ways to open a page for editing:
From the tree view — Click any page name, then click Edit content on the page detail view
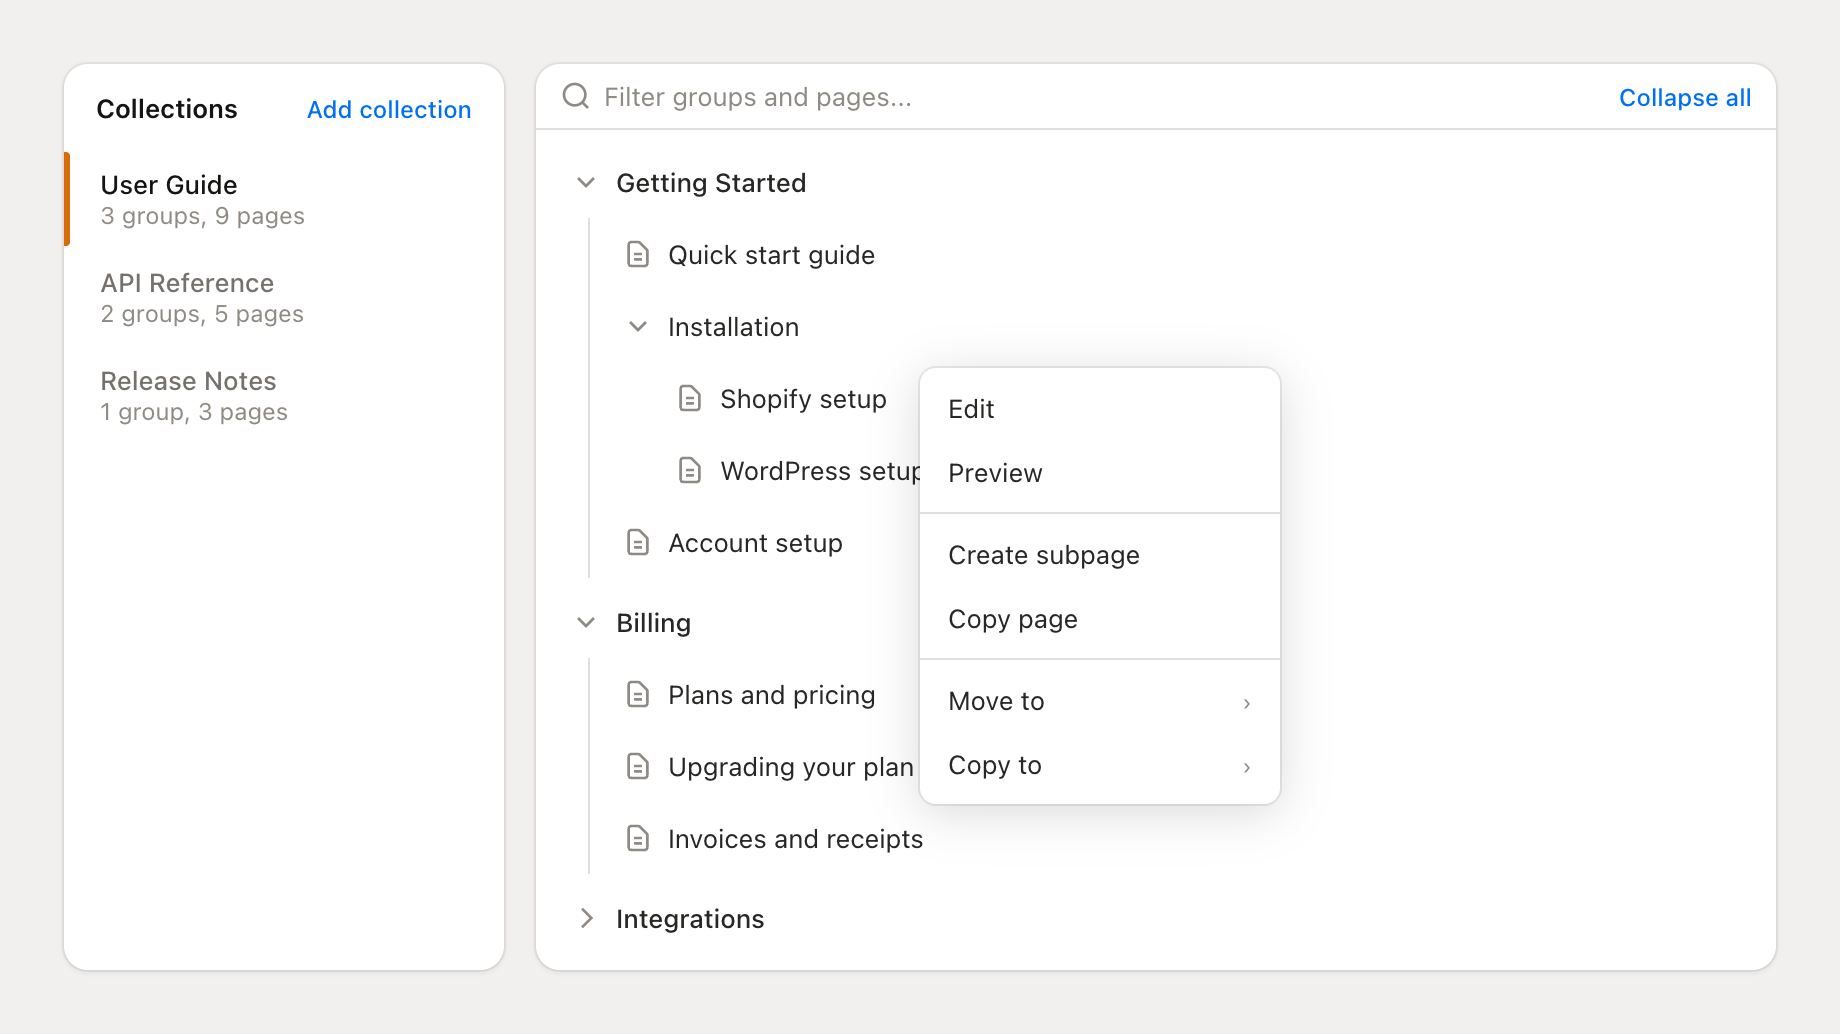
From the context menu — Right-click a page in the tree and select Edit
Both open the full-screen editor with a toolbar at the top, your content in the center, and an optional AI suggestions panel on the right.
Editing modes
The editor supports three modes. Switch between them using the mode selector in the top-right corner of the editor.
| Mode | Best for | Description |
|---|---|---|
| Visual | Most users | WYSIWYG block editor — what you see is what your readers see. Click to type, drag blocks to rearrange, use the toolbar for formatting. |
| Markdown | Fast writers | Write in Markdown syntax. Content is automatically converted to HTML when you switch modes or save. |
| HTML | Advanced users | Edit raw HTML directly with syntax highlighting. Use this for precise control over structure or to paste HTML from other sources. |
Formatting and toolbar
The visual editor toolbar gives you access to all formatting options without needing to write any code.
Text formatting
| Tool | What it does |
|---|---|
| Bold | Bold text for emphasis |
| Italic | Italic text for secondary emphasis or terms |
| Underline | Underlined text |
| Strikethrough | Crossed-out text for corrections or deprecated info |
| Inline code | Monospaced text for code references, commands, or file names |
| Link | Add a hyperlink to selected text |
Block elements
| Block | What it does |
|---|---|
| Headings (H1–H6) | Section headings in decreasing size. H2 and H3 are most common in docs articles. |
| Paragraph | Standard body text |
| Bulleted list | Unordered list with nested item support |
| Numbered list | Ordered list for sequential steps |
| Blockquote | Indented text block for quotes or emphasis |
| Code block | Syntax-highlighted code with language selection |
| Table | Data table with configurable rows and columns |
| Image | Upload an image or generate one with AI |
| Video | Embed a YouTube video |
Text alignment
Select a block of text and choose left, center, right, or justify alignment from the toolbar.
Rich content blocks
Beyond basic formatting, the editor includes structured content blocks that help you present information clearly. Insert them from the toolbar's block menu.
Callouts
Highlighted boxes for drawing attention to important information. Available styles:
Tip — Helpful advice or best practices
Note — Additional context or clarification
Info — Background information or definitions
Warning — Things to watch out for
Danger — Critical warnings or destructive actions
Steps
Numbered step-by-step guides with a title for each step. Use these for tutorials and walkthroughs where sequence matters. Each step gets its own numbered heading and content area.
Accordion
Expandable/collapsible sections. Useful for optional detail, troubleshooting tips, or long reference content that readers may not always need to see.
Tabs
Tabbed content areas where readers switch between views. Common uses include showing the same concept in different programming languages, or presenting platform-specific instructions side by side.
Card groups
Grid of cards for presenting options, features, or related links in a visual layout. Supports a 2-column grid arrangement.
Frames
Bordered containers for visually grouping related content. Use frames to set apart examples, case studies, or reference panels from the main content flow.
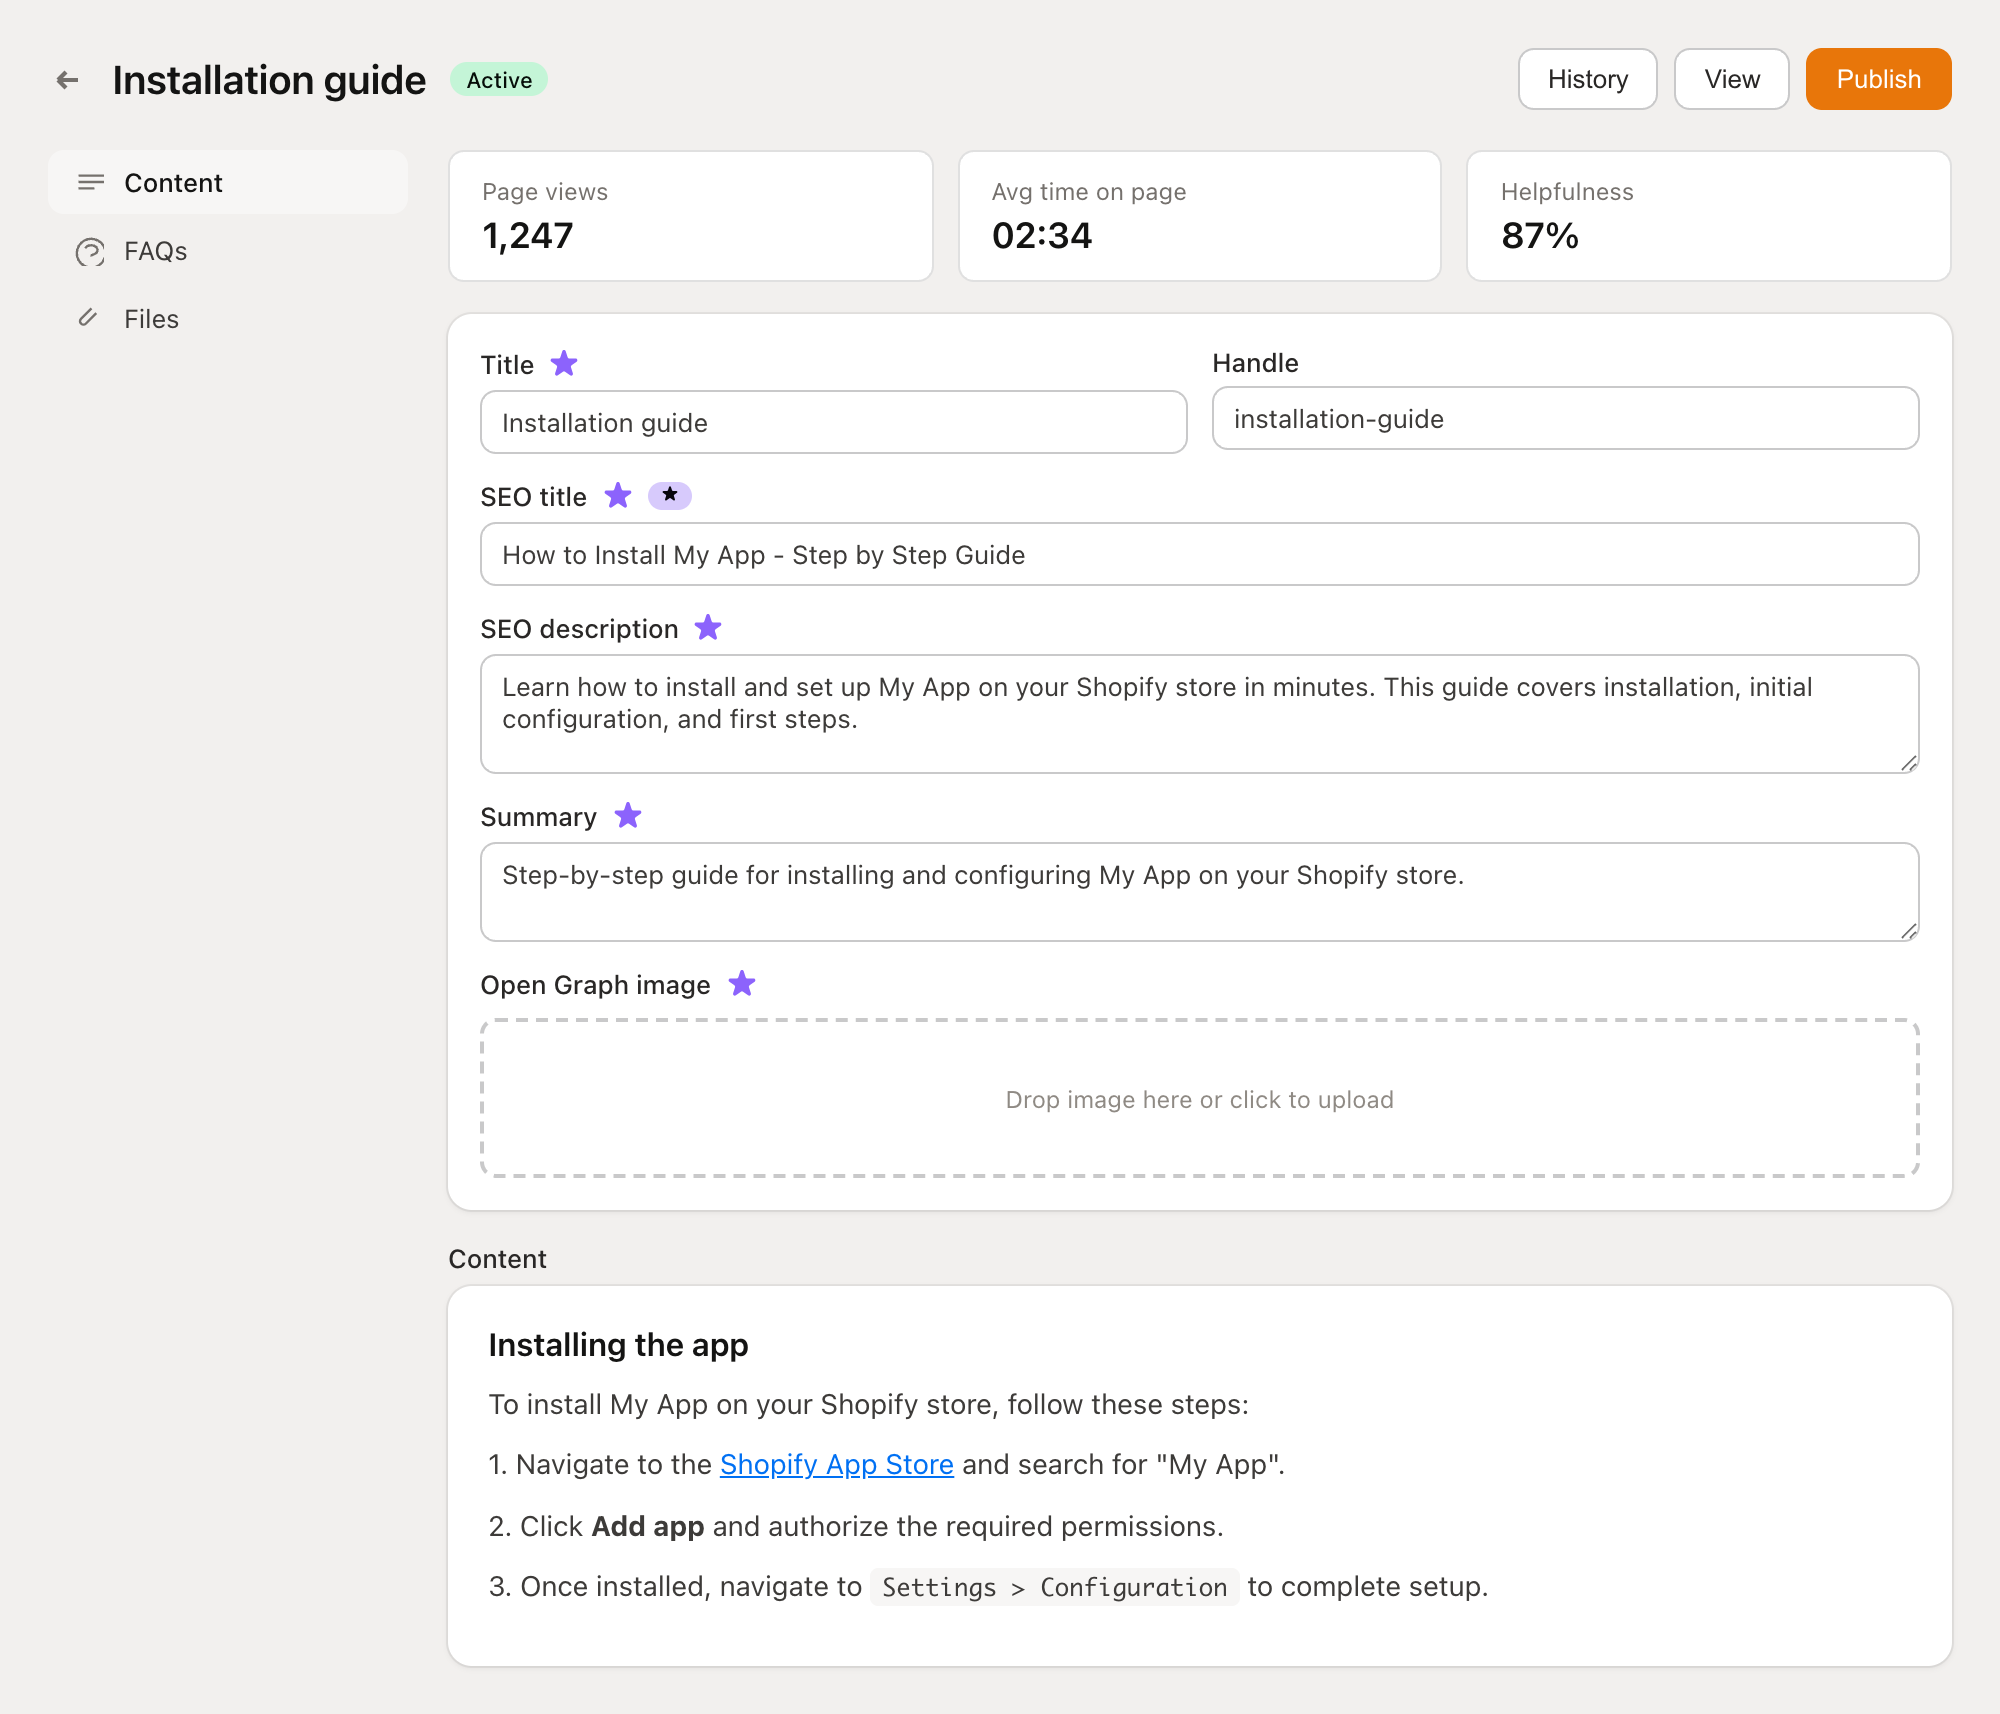
Page settings
Every page has metadata that controls how it appears in navigation, search engines, and social media. Access these from the page detail view (click a page in the tree without opening the full editor).
Core fields
| Field | Description |
|---|---|
| Title | The page name shown in navigation and at the top of the article. Keep it clear and descriptive. |
| Handle | The URL slug for this page (e.g., getting-started becomes yourdocs.com/getting-started). Auto-generated from the title but can be customized. |
| Summary | A brief description of the page content (max 300 characters). Used in search results and page previews. Supports AI generation. |
SEO fields
| Field | Description |
|---|---|
| SEO title | Custom title for search engine results. Defaults to the page title if left empty. AI can generate an optimized version. |
| SEO description | Meta description shown in search engine results. AI can generate this based on your page content. |
| Open Graph image | Preview image shown when your page is shared on social media, Slack, or other platforms. You can upload an image or generate one with AI. |
Page analytics
Published pages show basic analytics directly on the page detail view:
Page views — Total views and unique visitors
Average time on page — How long readers spend on the article
Helpfulness rating — Percentage based on reader thumbs up/down feedback
Use these metrics to identify which articles need improvement or expansion.
AI content generation
The editor includes AI tools that help you write faster without leaving the page.
Generating page content
Click the Generate with AI button in the editor toolbar
Describe what you want — be specific about the topic, audience, and format
Click Generate and wait for the result
Review the generated content and edit as needed

The AI uses your page title, existing content, and documentation context to produce relevant content. Good prompts make a big difference:
| Prompt quality | Example |
|---|---|
| Too vague | "Write about webhooks" |
| Good | "A getting started guide for setting up webhooks, including code examples in Node.js and common event types" |
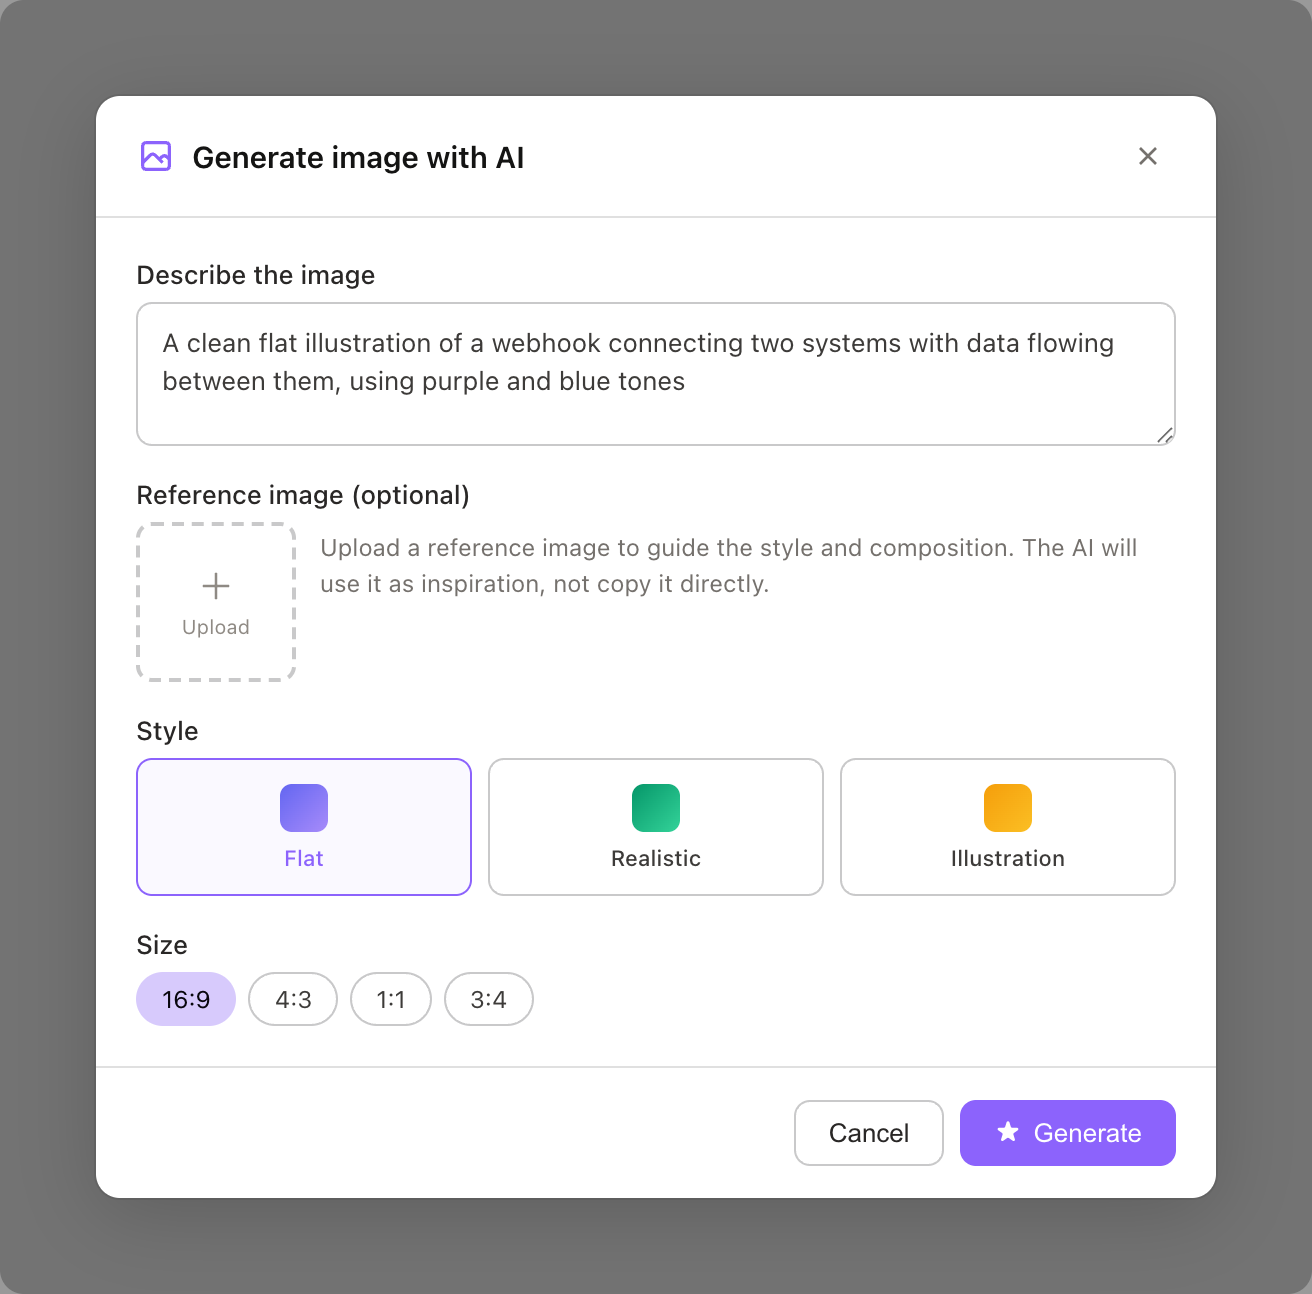
Generating images
Click the image icon in the toolbar, then select Generate with AI
Describe the image — include style, colors, and content details
Optionally upload reference images to guide the style
Click Generate and wait for the result
Click Use image to insert it into your page
You can also edit existing images by describing the changes you want.
Generating SEO fields
Each SEO field (title, description, summary) has a magic wand icon that generates an optimized version based on your page content. This is the fastest way to fill in metadata after writing your article.
AI suggestions
When you open a page in the visual editor, the AI suggestions panel appears on the right side. Mantle continuously analyzes your documentation and suggests improvements.
Each suggestion includes:
A short description of the proposed change
Reasoning for why the change would help (shown when you click the suggestion)
Apply and Dismiss buttons
Click Apply to accept a suggestion — the change is applied to your content but not saved until you explicitly save the page. Click Dismiss to permanently hide a suggestion you don't want.
Suggestion types include:
SEO improvements — Better titles and descriptions for search visibility
Content clarity — Rewording confusing sections or adding missing details
Structure recommendations — Suggestions for reorganizing or splitting content
Publishing workflow
Pages start as drafts and must be explicitly published to appear on your docs site.
Page lifecycle
| Status | What it means |
|---|---|
| Draft | Never published. Only visible to your team in the admin. |
| Published | Live on your docs site. Indexed by search engines and available to AI agents. |
| Unpublished changes | Published page with edits that haven't been pushed live yet. |
| Unpublished | Previously published, now hidden from customers. Content is preserved. |
| Archived | Removed from navigation entirely. Use this for outdated content you want to keep but not show. |
How to publish
Save your changes on the page
Click the Publish button
Review the publish modal — it shows exactly which fields changed since the last publish, with a diff view comparing old and new content
Click Publish changes to push everything live
For multi-language repositories, the publish modal lets you select which locale's changes to review.
Bulk publishing
To publish all draft pages at once, click the three-dot menu at the top of the tree view and select Publish all pages. This is useful after a large content migration or import.
FAQ management
Each page can have a list of frequently asked questions displayed below the main content. FAQs also appear in search results and can be used by AI agents.
Adding FAQs
Open a page and go to the FAQs tab
Click Add FAQ
Enter a question and answer (the answer uses the same rich text editor)
Optionally choose an icon and set the status (Active or Draft)
Save the FAQ
Organizing FAQs
Drag the handle on any FAQ row to reorder them. The order you set here matches what readers see on the published page.
Use the search field to filter FAQs when you have many on a single page.
Multi-language FAQs
FAQ questions and answers support per-locale translations. When viewing a non-default locale, empty fields fall back to the default language. Use the Translate All button to auto-translate missing FAQ content.
File attachments
Attach downloadable files to any page — PDFs, images, archives, or any other file type your readers might need.
Open a page and go to the Files tab
Click Add file
Upload your file (drag-and-drop or click to browse)
Add a name and optional description
Save
File names and descriptions can be translated for multi-language repositories. The uploaded file itself is shared across all locales.
Multi-language editing
If your repository supports multiple languages, you can switch between locales using the language selector at the top of the page editor.
How locale fallback works
When a field is empty in a non-default locale, it automatically falls back to the default language content. This means your docs site always shows something to readers, even if a translation is incomplete. Fields using fallback content are marked with a fallback indicator in the editor so you can see what still needs translating.
Translating content
You have three options for translating page content:
| Method | How it works |
|---|---|
| Manual | Switch to the target locale and type the translated content directly. |
| Field-by-field AI | Click the magic wand next to any field to AI-translate just that field. |
| Translate All | Click the Translate All button to auto-translate every empty field on the page in one click. Shows a count of fields that need translation. |
Auto-translation
For hands-off translation, enable Auto-translate in your repository's language settings. When enabled, edits to your default language content are automatically translated to all enabled languages. Changes are batched — multiple edits within 10 minutes are translated together to maintain consistency.

Customizing your docs website
Each repository gets a hosted website you can customize. Click Customize website in your repository settings to open the theme editor, which shows a live preview on the left and customization settings on the right.
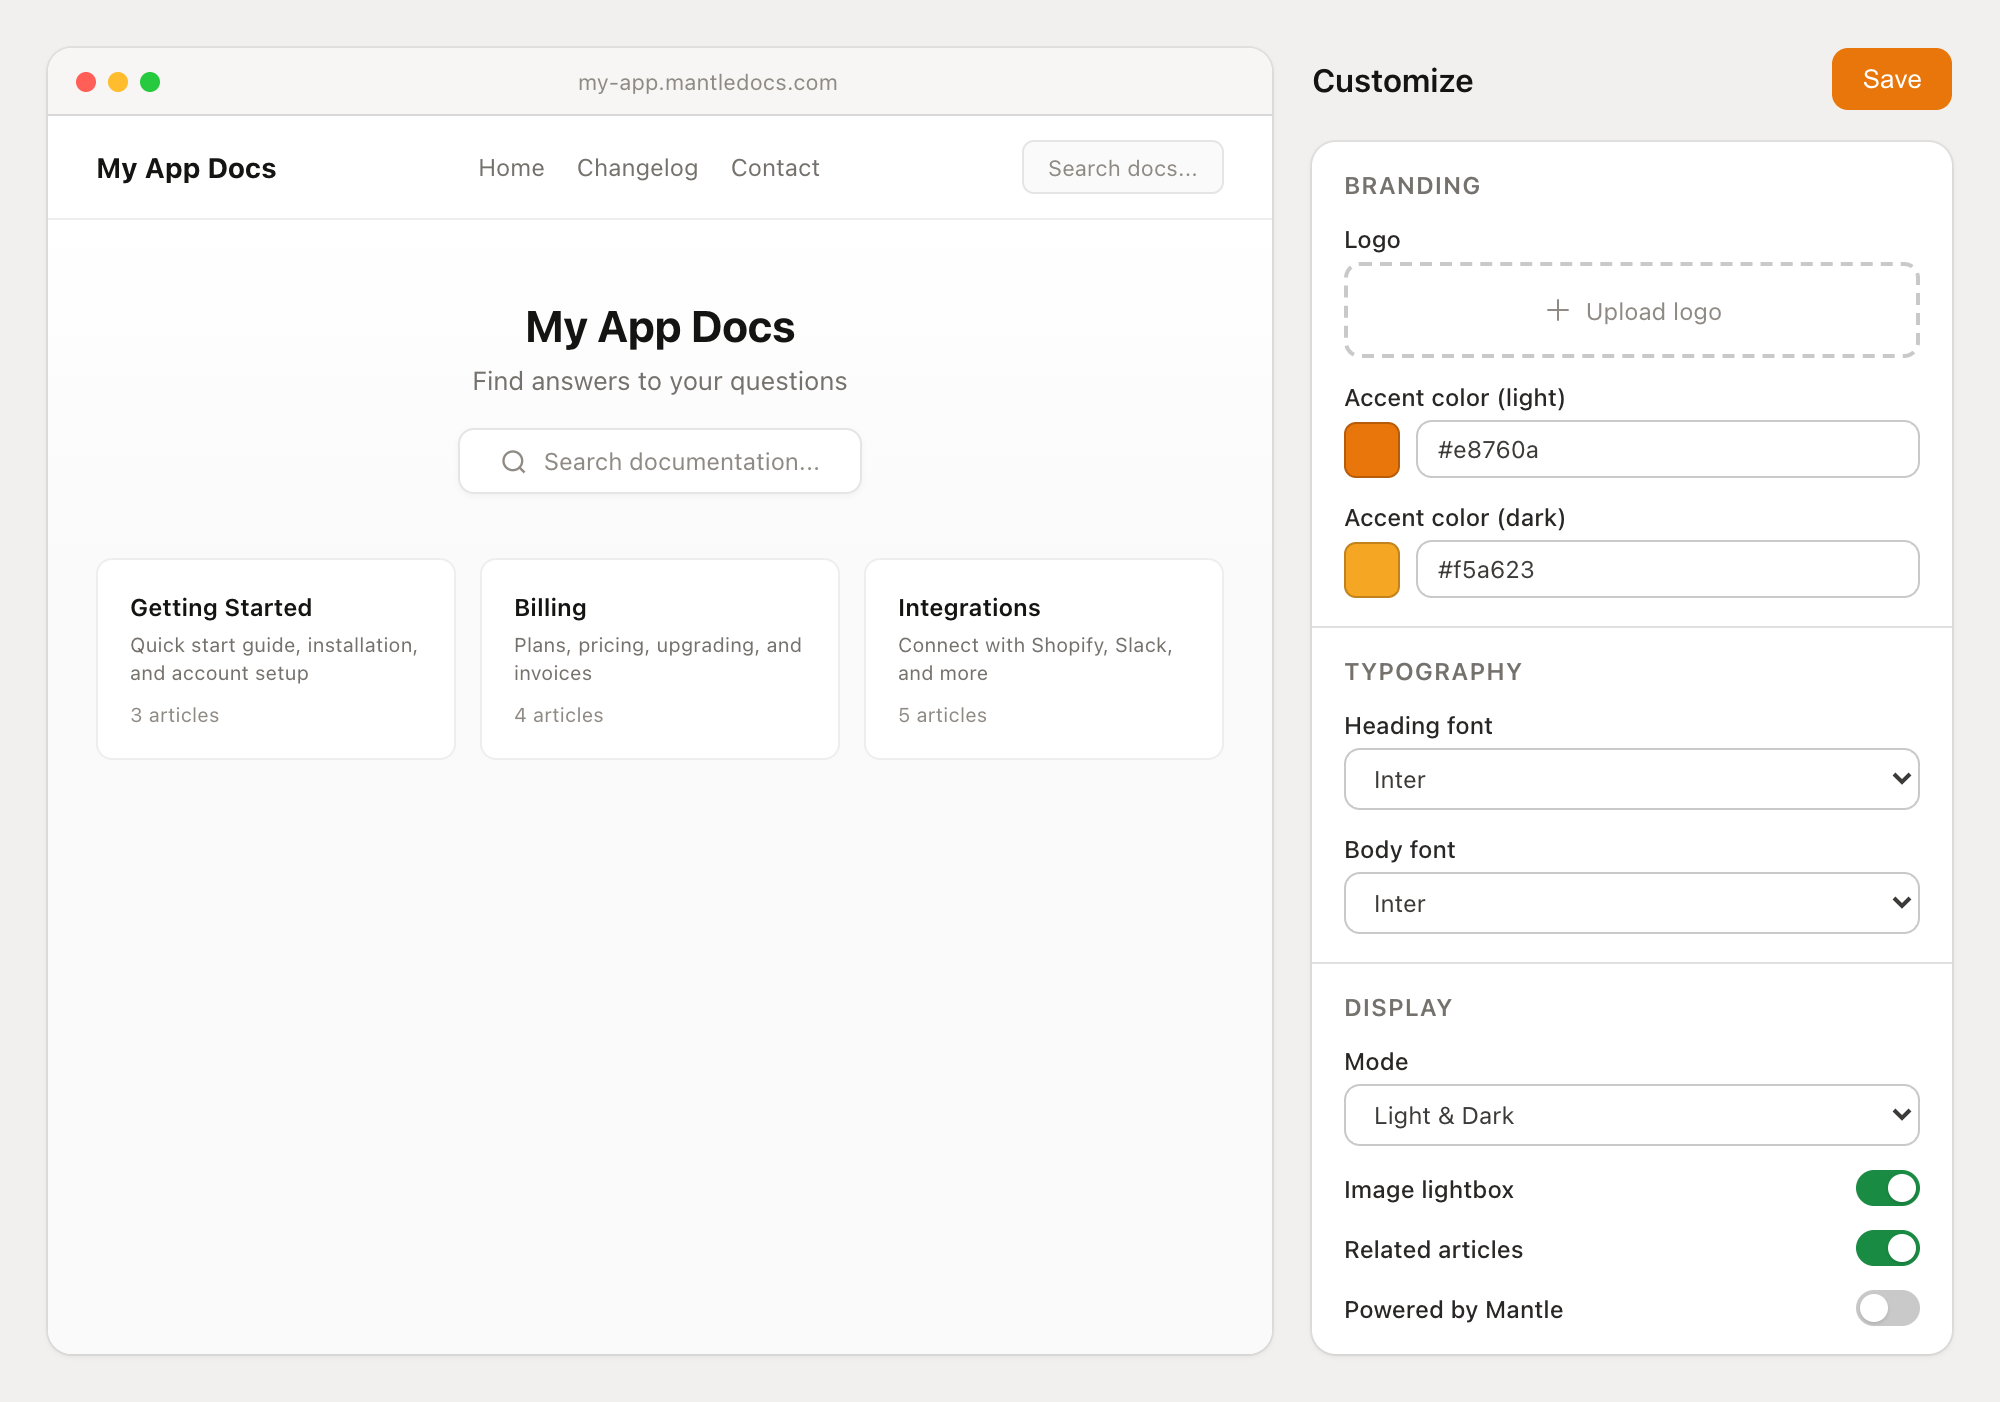
Branding
| Setting | Description |
|---|---|
| Logo | Your brand logo, shown in the header and footer |
| Favicon | Browser tab icon |
| OG image | Default social sharing image for pages without their own |
| Accent color | Primary brand color used for links, buttons, and interactive elements. Set separately for light and dark modes. |
Typography
| Setting | Description |
|---|---|
| Heading font | Font family for headings (default: Inter) |
| Heading line height | Spacing between heading lines (default: 1.2) |
| Body font | Font family for body text (default: Inter) |
| Body line height | Spacing between body text lines (default: 1.4) |
Layout and display
| Setting | Description |
|---|---|
| Display mode | Light only, dark only, or let readers toggle between light and dark |
| Image lightbox | When enabled, readers can click images to view them full-size |
| Related articles | Show related articles at the bottom of each page (configurable count) |
| "Powered by Mantle" | Toggle the Mantle branding in the footer |
Navigation
Header links — Add custom navigation links to the header (e.g., link back to your main site or changelog). Drag to reorder.
Footer link groups — Organize footer links into labeled groups. Each group can contain multiple links.
Advanced
| Setting | Description |
|---|---|
| Google Analytics | Add your GA tracking code to track docs site traffic |
| Custom CSS | Inject custom CSS for advanced styling beyond the theme editor |
| Custom JS | Inject custom JavaScript for analytics, chatbots, or other integrations |
Repository settings
Access repository settings by clicking the gear icon on your repository page.
| Setting | Description |
|---|---|
| Subdomain | Your docs URL on mantledocs.com (e.g., yourapp.mantledocs.com) |
| Custom domain | Connect your own domain (e.g., docs.yourapp.com). SSL is provisioned automatically. |
| Languages | Add supported languages, set defaults, and enable auto-translation per locale |
| Widget | Embed a support widget on your docs site for live chat |
| Redirects | Forward old URLs to new locations when you restructure content |
Tips for writing great docs
Start with the reader's goal — Open each article by saying what the reader will accomplish, not what the feature does.
Use headings liberally — H2 for major sections, H3 for subsections. Readers scan before they read.
Prefer numbered lists for steps — If sequence matters, use ordered lists. For options or features, use bulleted lists.
Add callouts for warnings and tips — Don't bury important caveats in paragraph text.
Keep pages focused — One topic per page. If a page covers more than one concept, split it.
Fill in SEO fields — Use AI generation to quickly create optimized titles and descriptions for every page.
Review analytics — Check page views and helpfulness ratings to identify articles that need attention.