

Getting started with Checklists
Checklists guide your customers through onboarding and feature adoption. Instead of hoping users figure things out on their own, you define the steps they should take—and track their progress automatically.
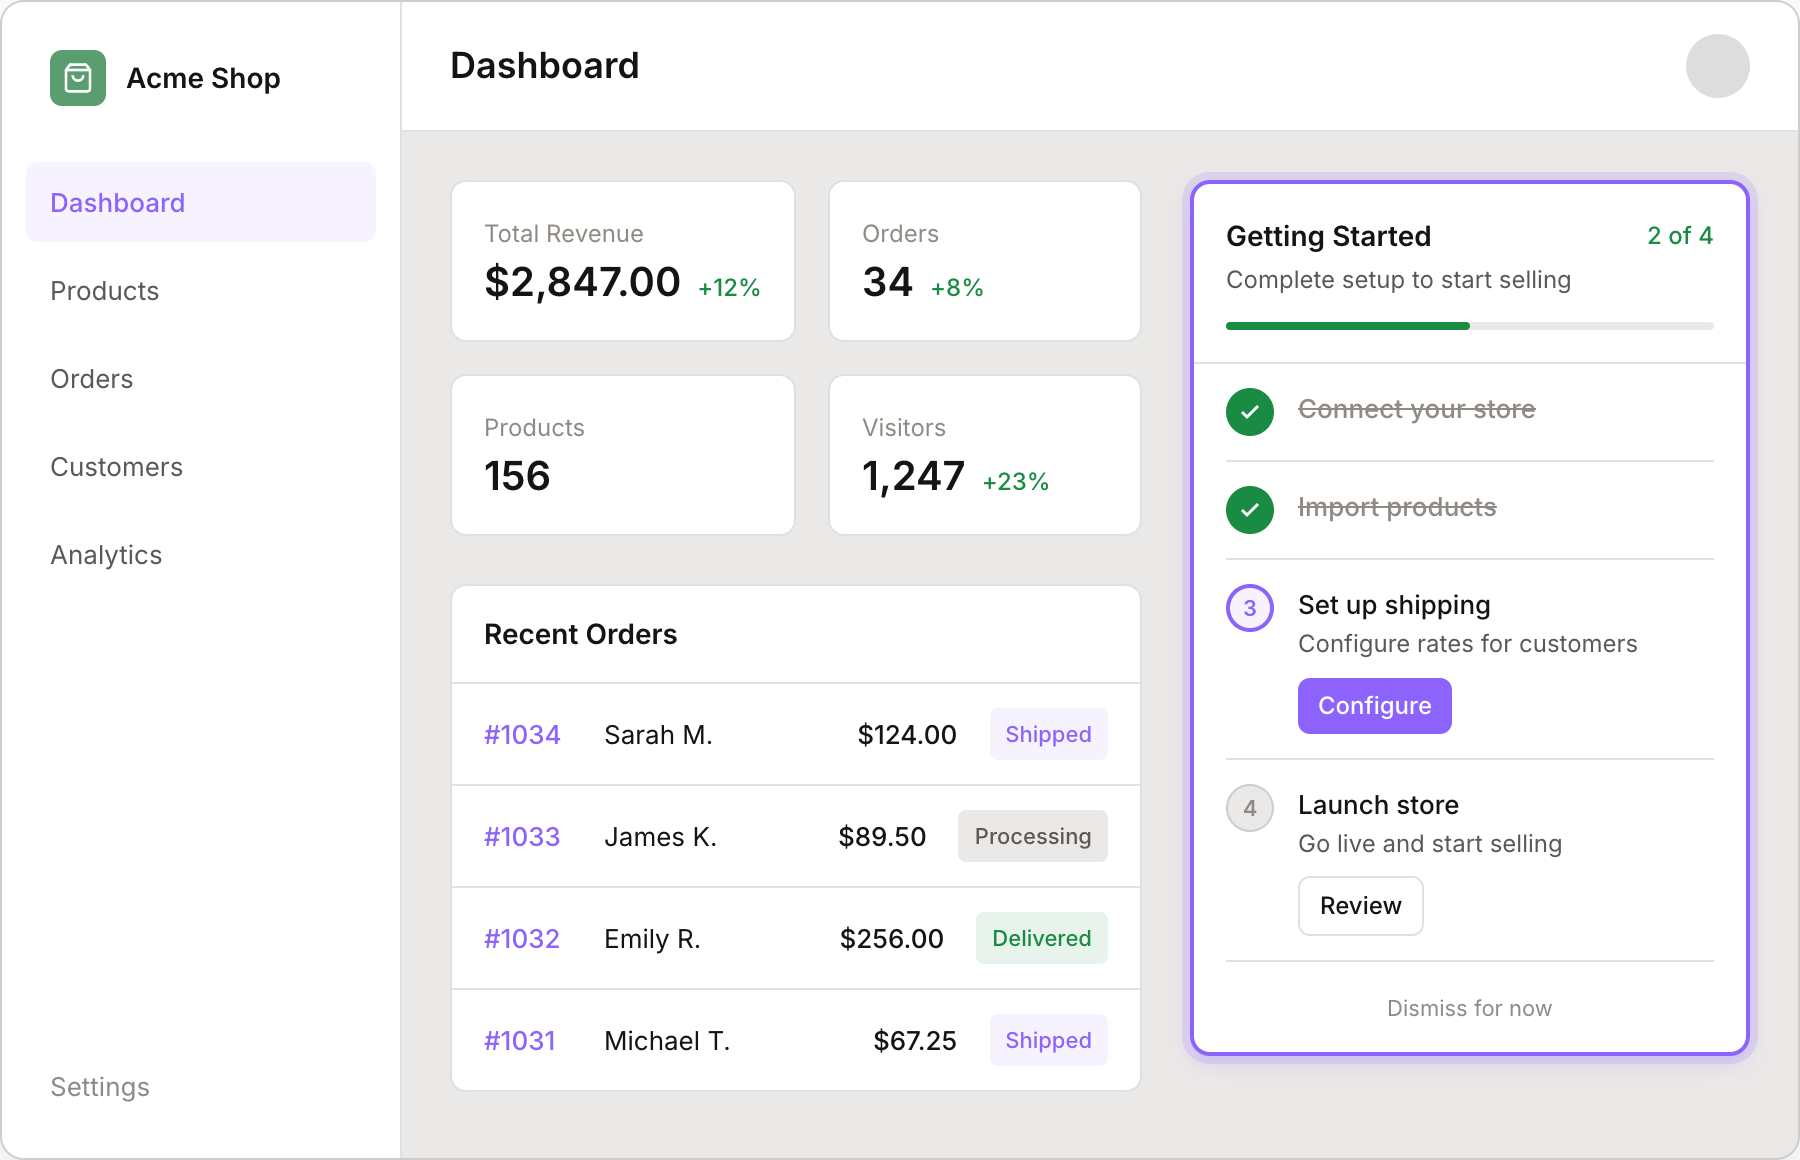
This is what your customers see—a checklist widget embedded in your app with progress tracking, step descriptions, and action buttons. You control everything: the steps, completion conditions, and when it appears.
What you can do with checklists
Guide new users through setup with a clear sequence of steps
Drive feature adoption by introducing capabilities at the right time
Track progress automatically based on usage events, metrics, or custom fields
Target specific segments to show different checklists to different customers
Trigger flows when customers complete steps or entire checklists
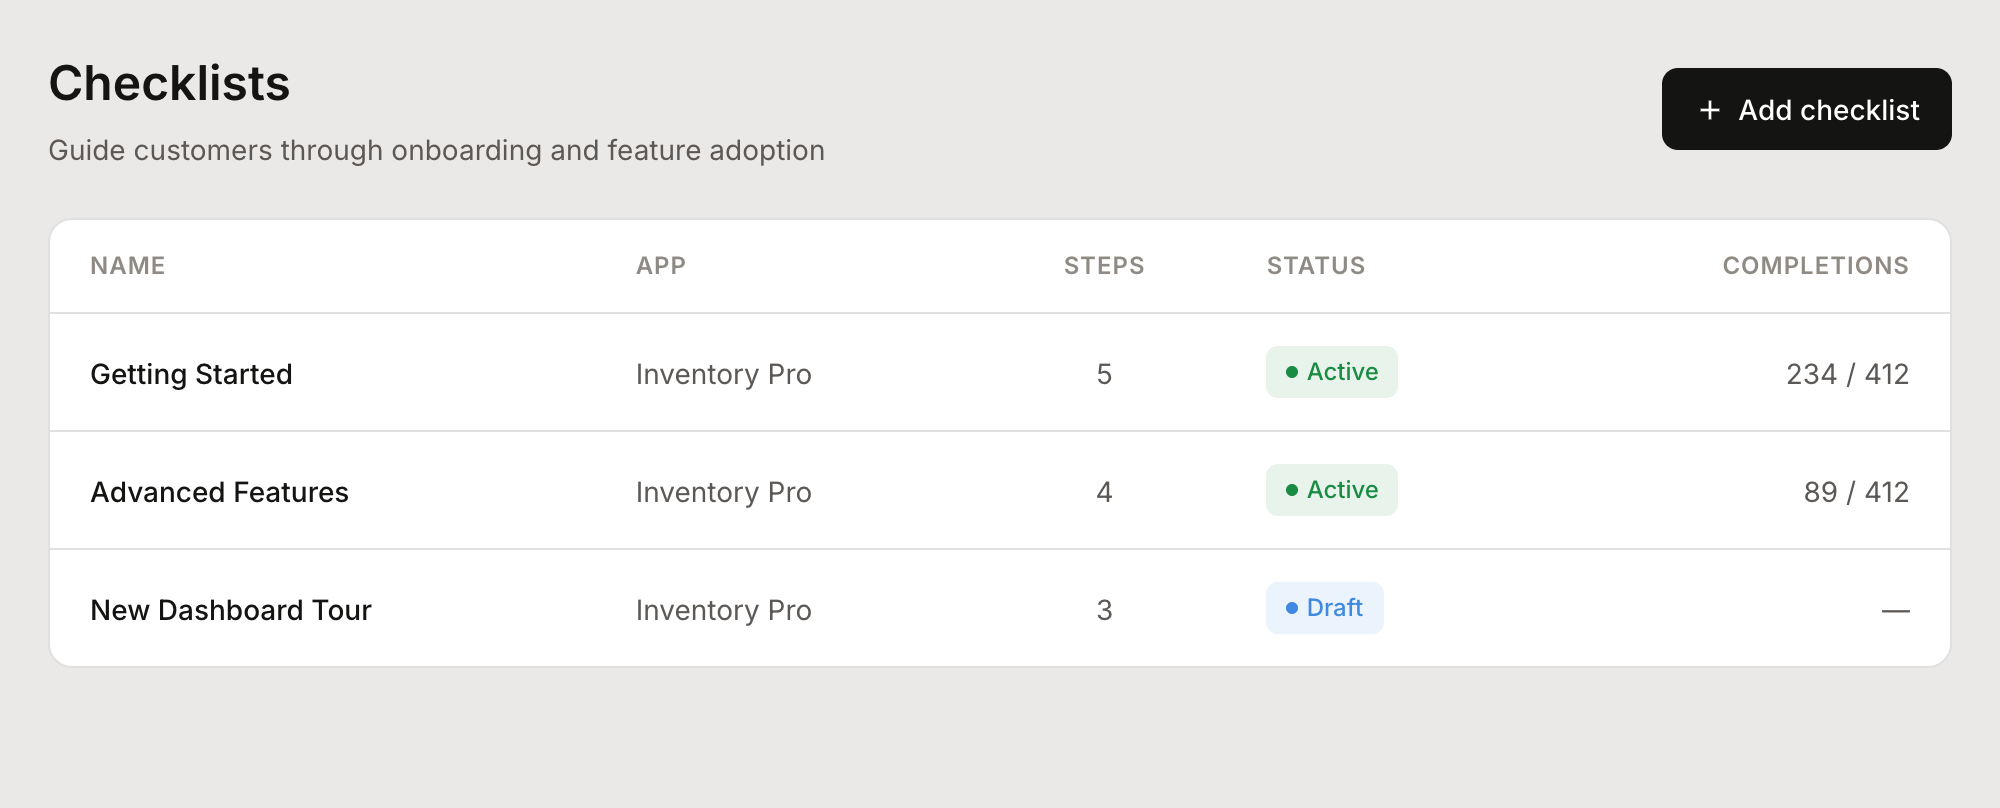
Creating a checklist
To create a new checklist:
Go to Checklists from the main navigation
Click Add checklist
Fill in the basics:
Name — Internal name for your reference
App — Which app this checklist belongs to
Title — What customers see as the checklist title
Description — Brief explanation of what completing the checklist achieves
Optionally, choose a customer segment to limit who sees this checklist
Click Create checklist
Your checklist starts as a draft. Add steps before publishing.
Adding steps
Steps are the individual tasks that make up your checklist. Each step needs a name and a completion condition.
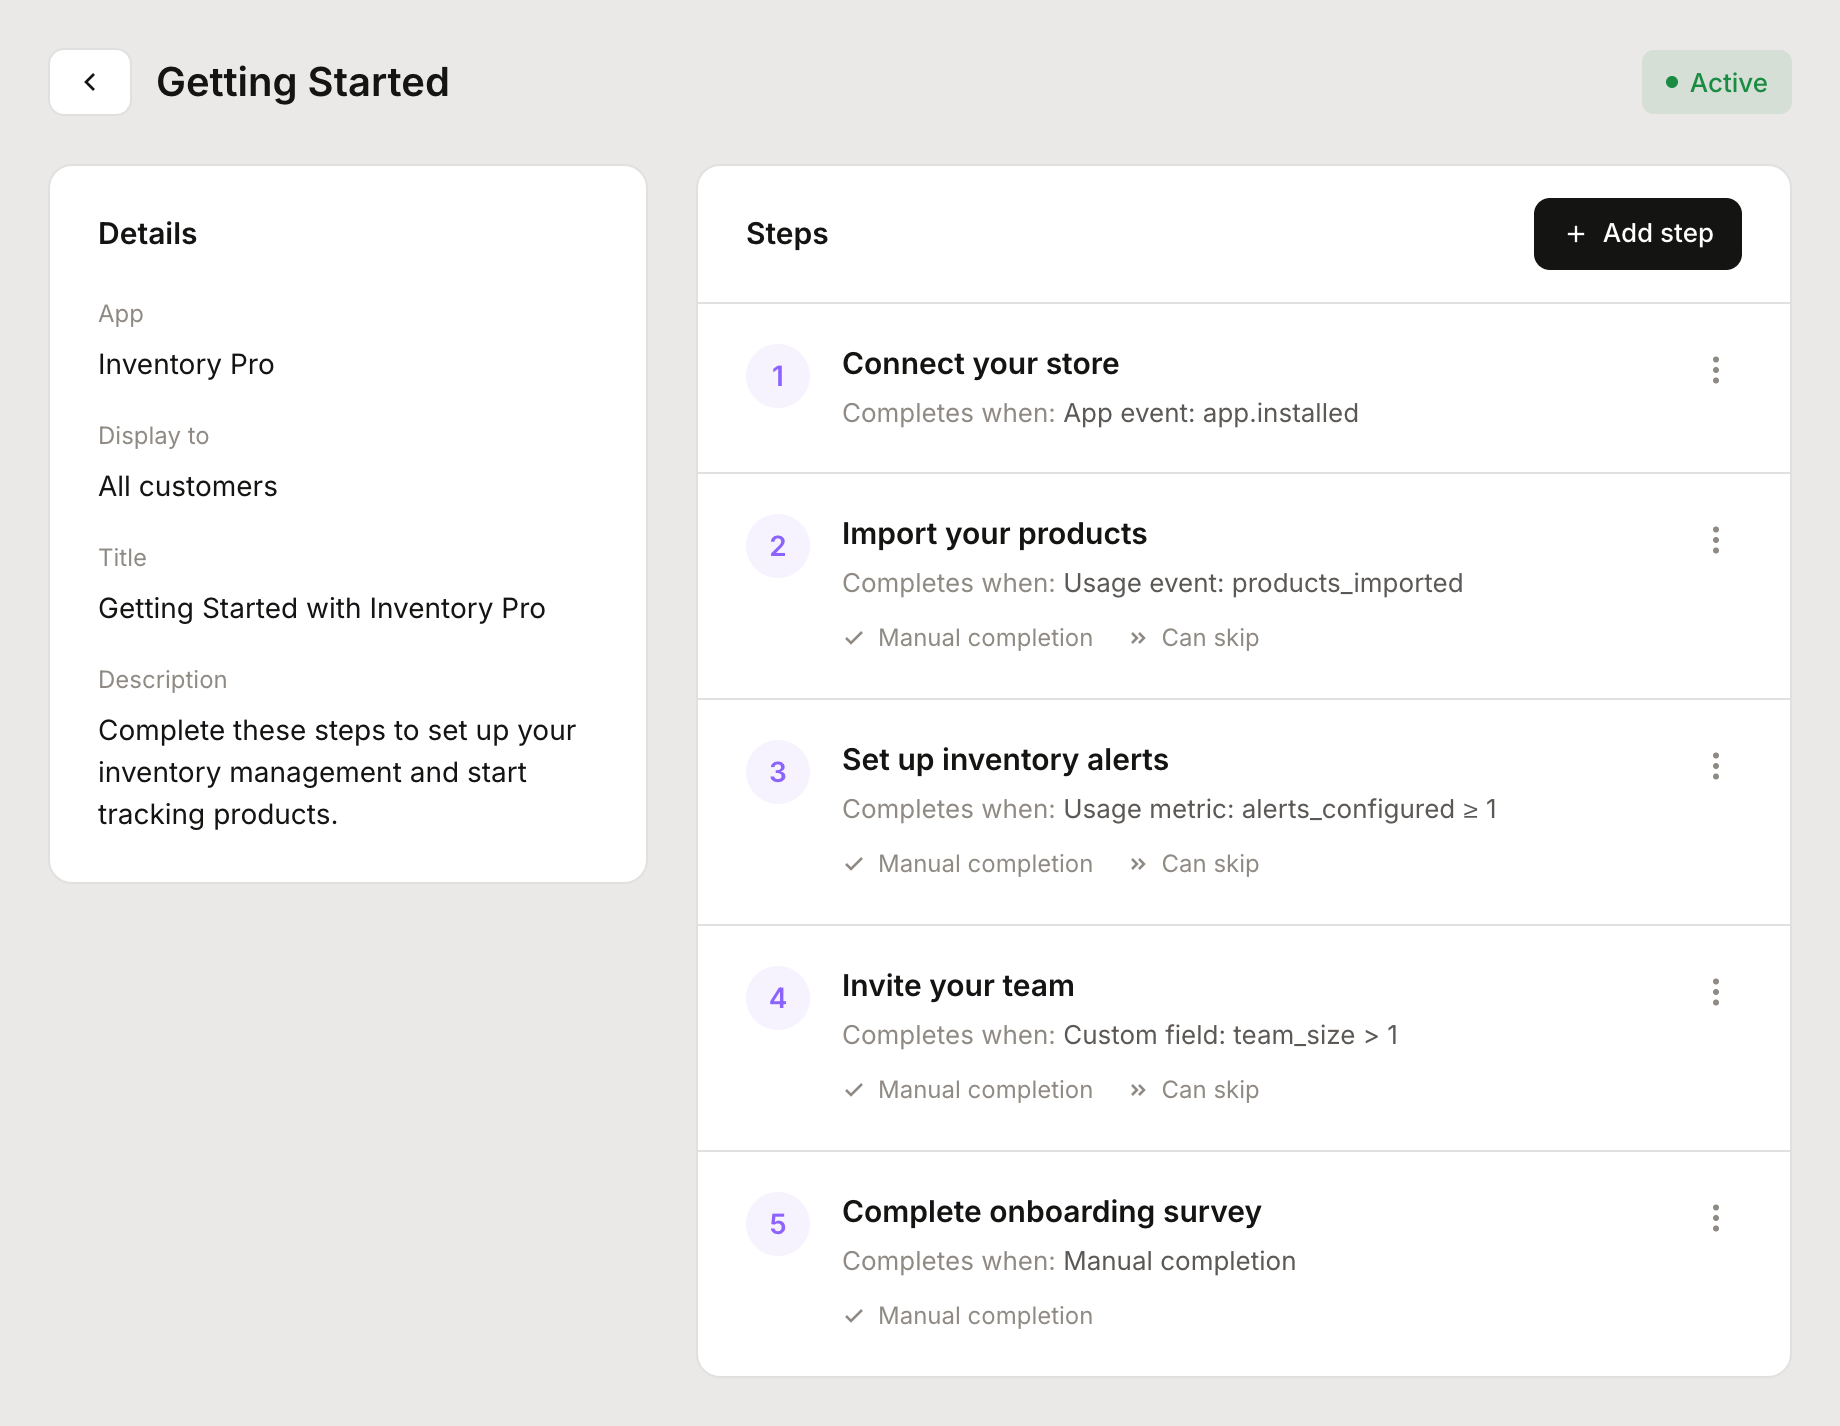
To add a step:
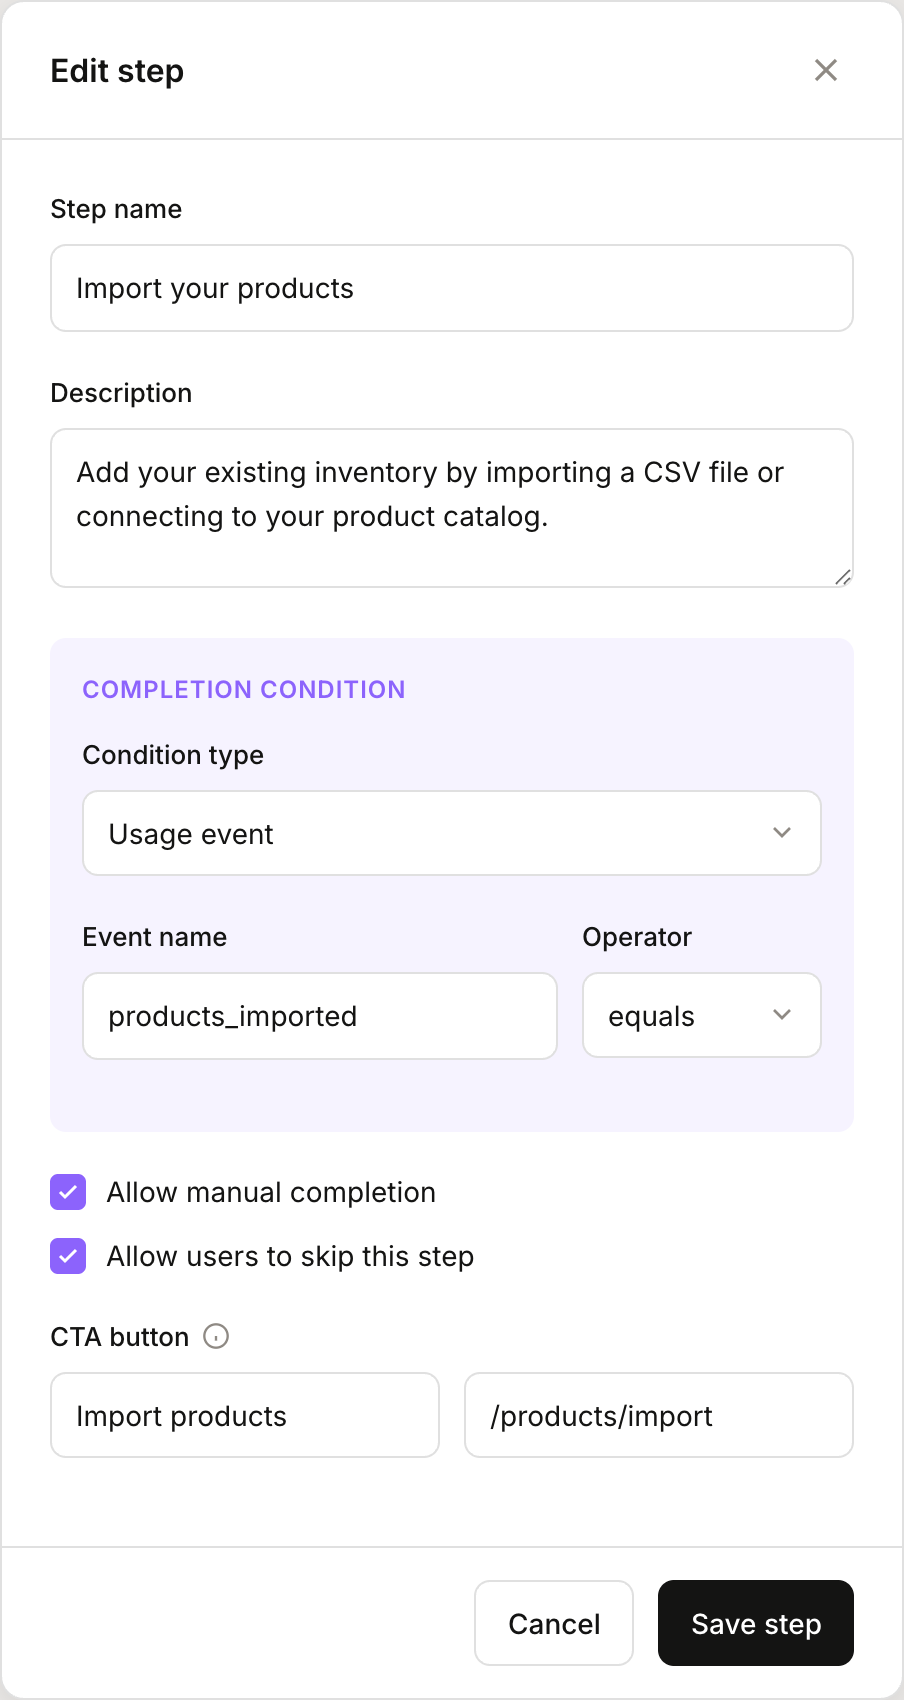
Click Add step in the checklist editor
Enter a step name (what the customer sees)
Add a description explaining what to do
Choose a completion condition (see below)
Optionally add a CTA button with a label and URL
Click Save step
Step completion conditions
Steps can complete automatically or require manual action. Choose the condition type that matches how you'll know the step is done:
Condition type | When to use |
|---|---|
Usage event | Completes when a specific event fires (e.g., |
Usage metric | Completes when a metric reaches a threshold (e.g., |
Custom field | Completes when a customer's custom field matches a value (e.g., |
App event | Completes on app lifecycle events like |
Manual / API | Completes only when manually marked done by the user or via API. Use for subjective steps like "Review your settings." |
Optional step settings
Allow manual completion — Let users mark a step done even if conditions aren't met. Useful for steps that might not trigger your events reliably.
Allow skip — Let users skip a step entirely. Good for optional setup steps.
Step dependencies — Require other steps to be completed first. Creates a sequential flow.
Publishing your checklist
Checklists start as drafts. Once you've added all your steps:
Review your steps and completion conditions
Click Publish in the header
Published checklists immediately become visible to customers who match your targeting (or all customers, if no segment is specified).
To make changes to a published checklist, edit it directly. Changes take effect immediately. To stop showing a checklist, unpublish it.
Displaying checklists in your app
To show checklists to your customers, use the @heymantle/react SDK. The useMantle hook provides methods to fetch and manage checklist state.
Fetching checklists
import { useMantle } from "@heymantle/react";

function OnboardingChecklist() {
  const { getChecklist, getChecklists, showChecklist } = useMantle();
  const [checklist, setChecklist] = useState(null);

  useEffect(() => {
    async function loadChecklist() {
      // Fetch by handle
      const result = await getChecklist("getting-started");
      if (result) {
        setChecklist(result);
        // Mark as shown for accurate tracking
        await showChecklist({ idOrHandle: result.id });
      }
    }
    loadChecklist();
  }, []);

  if (!checklist) return null;

  return (
    <div>
      <h3>{checklist.title}</h3>
      <p>{checklist.completedSteps} of {checklist.totalSteps} complete</p>
      {checklist.steps.map(step => (
        <ChecklistStep key={step.id} step={step} />
      ))}
    </div>
  );
}
Completing and skipping steps
For steps that allow manual completion or skipping, use the provided callbacks:
function ChecklistStep({ checklistId, step }) {
  const { completeChecklistStep, skipChecklistStep } = useMantle();

  const handleComplete = async () => {
    await completeChecklistStep({
      idOrHandle: checklistId,
      stepIdOrHandle: step.id,
    });
  };

  const handleSkip = async () => {
    await skipChecklistStep({
      idOrHandle: checklistId,
      stepIdOrHandle: step.id,
    });
  };

  return (
    <div>
      <span>{step.name}</span>
      {step.allowManualCompletion && !step.completed && (
        <button onClick={handleComplete}>Mark done</button>
      )}
      {step.allowSkip && !step.completed && !step.skipped && (
        <button onClick={handleSkip}>Skip</button>
      )}
    </div>
  );
}
Checklist data structure
Each checklist returned from the API includes:
Field | Description |
|---|---|
| Unique identifier |
| URL-friendly slug for referencing the checklist |
| Display title for customers |
| Optional description text |
| Array of step objects |
| Number of steps completed |
| Total number of steps |
| Completion percentage (0-100) |
Each step includes:
Field | Description |
|---|---|
| Unique identifier |
| URL-friendly slug |
| Display name |
| Step description |
| Whether the step is complete |
| Whether the step was skipped |
| Can be manually marked done |
| Can be skipped |
| Optional button label |
| Optional button URL |
Tracking customer progress
Once a checklist is published, you can see how individual customers are progressing.
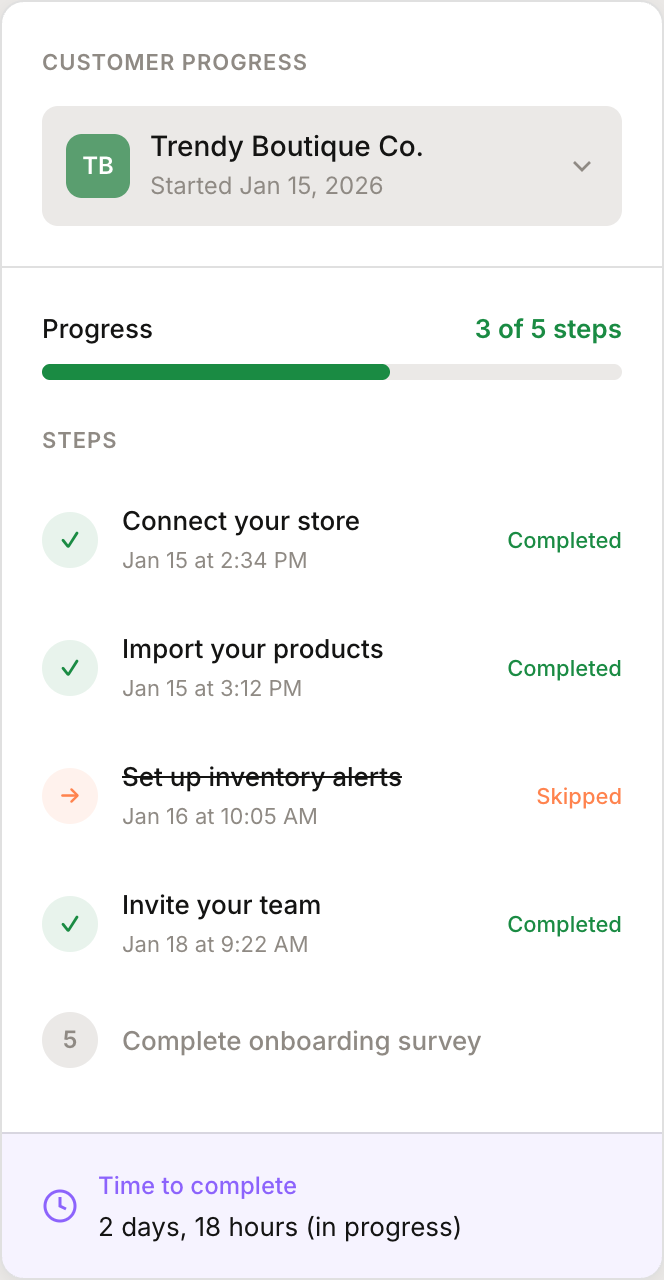
From the checklist editor, use the Customer progress panel to:
Select a customer to view their progress
See which steps they've completed, skipped, or haven't started
View timestamps for each completion
Manually toggle step completion if needed
Targeting with segments
Not every customer needs the same checklist. You can target checklists to specific customer segments:
New vs. returning customers — Show onboarding to new signups, advanced features to power users
Plan-based targeting — Different checklists for free vs. paid customers
Feature-based targeting — Guide users who haven't used a specific feature yet
Set the segment when creating the checklist, or leave it as "All customers" to show it to everyone.
Triggering flows from checklists
Checklists integrate with Flows to automate follow-up actions. You can trigger flows when:
A checklist is first shown to a customer
A specific step is completed
The entire checklist is completed
Common uses:
Send a congratulations email when onboarding is complete
Notify your team when a customer completes a key step
Add a tag to customers who finish your setup checklist
Viewing checklist reports
Go to Reports > Checklists to see aggregate data:
Completion rate — Percentage of customers who completed each step
Skip rate — How often each step is skipped
Time to complete — Average time from first view to completion
Customer breakdown — Filter by segment to compare cohorts
Use these insights to improve your checklists—if a step has a high skip rate, it might be unclear or unnecessary.
Best practices
Keep it short. 3-7 steps is ideal. Longer checklists feel overwhelming.
Start with quick wins. Put easy steps first to build momentum.
Use clear action verbs. "Connect your store" is better than "Store connection."
Add helpful descriptions. Explain why each step matters, not just what to do.
Enable skip for optional steps. Don't force users through steps that don't apply to them.
Review completion data. If a step has low completion, investigate why and adjust.